
Content ITV PRO
This is Itvedant Content department
Business Scenario
Hello talented developers!
ShopKart has successfully implemented its product listing and filtering functionality. Customers can now browse products and find items they are interested in purchasing.
What’s Already Working?
Product listing and filtering are implemented.Customers can now browse products and find items they are interested in purchasing
The Challenge
Add to Cart buttons are currently only part of the product interface.
Customers need a proper shopping cart where they can:
In this lab, students will transform the existing ShopKart product-selection experience into a fully functional shopping cart.
Pre-Lab Preparation
Module:
1) Handling Side-Effects
2) Handling Forms in React
git pull origin branchNameGit Pull
Task 1 : Create the Cart Page Structure
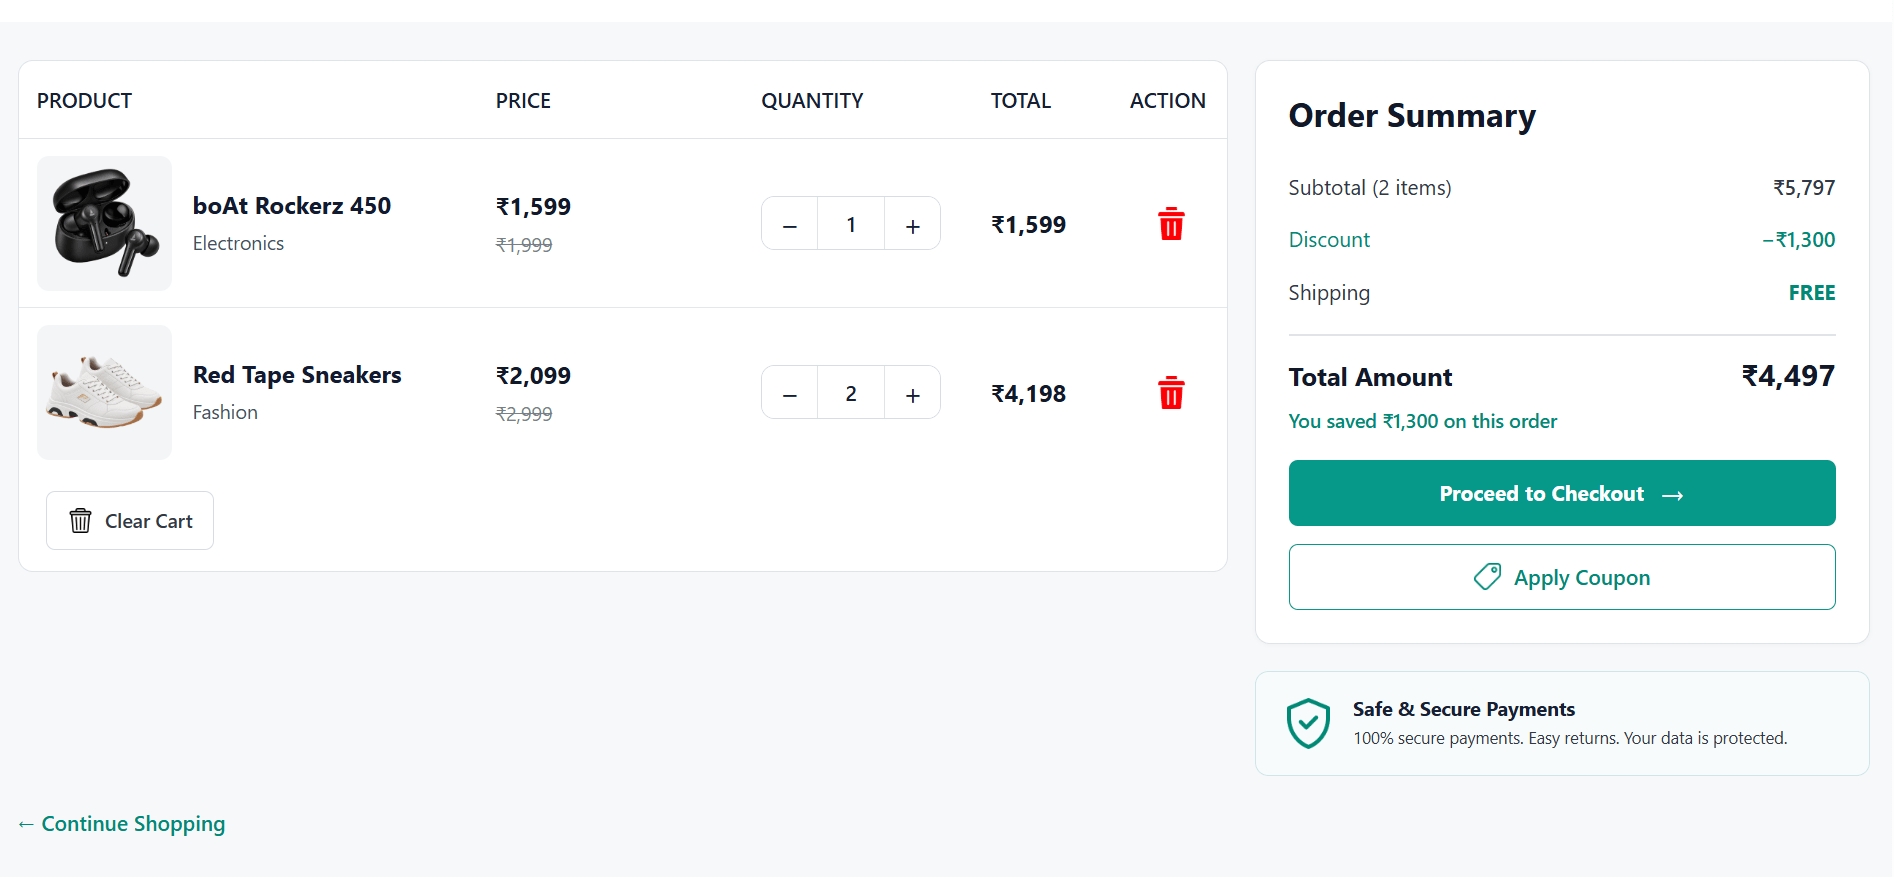
Cart.jsx page in the project, but it is currently only a placeholder.Open Cart.jsx and Create the Cart Table structure.
1
function Cart() {
  return (
    <div className="cart-page">
      <div className="cart-container">

        {/* Cart Table */}
        <div className="cart-table-wrapper">
          <table className="cart-table">
            <thead>
              <tr>
                <th>PRODUCT</th>
                <th>PRICE</th>
                <th>QUANTITY</th>
<th>TOTAL</th>
<th>ACTION</th>
</tr>
</thead>
<tbody>
{/* Product 1 */}
<tr className="cart-item-row">
<td>
<div className="cart-product">
<div className="cart-product-image">
<img src="/images/products/headphones.png" alt="boAt Rockerz 450" />
</div>
<div className="cart-product-info">
<h3>boAt Rockerz 450</h3>
<p className="cart-category">Electronics</p>
</div>
</div>
</td>
<td>
<div className="cart-price">
<strong>₹1,599</strong>
<span className="original-price">₹1,999</span>
</div>
</td> <td>
<div className="quantity-control">
<button type="button">−</button>
<span>1</span>
<button type="button">+</button>
</div>
</td>
<td> <strong className="item-total">₹1,599</strong> </td>
<td>
<button type="button" className="delete-btn">
<img src="/icons/delete-icon.png" alt="Delete" />
</button>
</td>
</tr>
</tbody>
</table>
{/* Clear Cart */}
<div className="cart-footer">
<button type="button" className="clear-cart-btn">
<img src="/icons/clear-cart.png" alt="" /> Clear Cart
</button>
</div>
</div>
);
}
export default Cart;Create Order Summary & Continue Shopping
2
{/* Order Summary */}
<aside className="cart-sidebar">
  <div className="order-summary">
    <h2>Order Summary</h2>

    <div className="summary-row">
      <span>Subtotal (2 items)</span>
      <span>₹5,797</span>
    </div>

    <div className="summary-row discount-row">
      <span>Discount</span>
      <span>−₹1,300</span>
</div>.cart-table-wrapper: <div className="summary-row">
<span>Shipping</span>
<span className="free-shipping">FREE</span>
</div>
<div className="summary-divider"></div>
<div className="summary-total">
<span>Total Amount</span>
<strong>₹4,497</strong>
</div>
<p className="saved-message">You saved ₹1,300 on this order</p>
<button type="button" className="checkout-btn">
Proceed to Checkout
<span>→</span>
</button>
<button type="button" className="coupon-btn">
<img src="/icons/coupon.png" alt="" />
Apply Coupon
</button>
</div>
{/* Secure Payment */}
<div className="secure-box">
<img src="/icons/security-icon.png" alt="" className="secure-icon" /> <div>
<h3>Safe & Secure Payments</h3>
<p>100% secure payments. Easy returns. Your data is protected.</p>
</div>
</div>
</aside>
</div>
{/* Continue Shopping */}
<div className="cart-navigation">
<Link to="/products" className="continue-shopping">← Continue Shopping</Link>
</div>
</div>Style the Cart Page
3
Since we now use Link, don't forget to add the import.
Add Cart Page Route
4
<Route path="/cart" element={<Cart />} />Connect Navbar Cart Icon to /cart
5
<Link to="/cart" className="cart-wrapper">

  <img src="/icons/cart-icon.png" alt="Cart" className="nav-icon" />
  <span className="cart-count"> 3 </span>

</Link>
Move Cart State to App.jsx
6
In App.jsx : import useReducer
7
Products --> App --> Cart --> Navbar
App.jsx because App.jsx is the common parent of: Navbar, Products, Cartimport React, { useEffect, useReducer} from "react";Then inside App component :
const [cart, dispatch] = useReducer(
  cartReducer,
  []
);
Why useReducer?
The shopping cart has multiple related actions that need to update the same cart state.
Instead of creating separate state logic for every operation, useReducer gives us one central place to manage all cart state changes.
Task 2 : Create Cart Reducer Logics
Create the reducer logic for Adding Item to cart
1
function cartReducer(state, action) {

  switch (action.type) {
    case "ADD_ITEM": {

      const existingItem = state.find((item) => item.id === action.payload.id);

      if (existingItem) {

        return state.map((item) =>
          item.id === action.payload.id
? {
...item,
quantity: item.quantity + 1
}
: item
);
}
return [
...state,
{
...action.payload,
quantity: 1
}
];
}cartReducer function receives two things:state → The current cart data.action → Describes what the user wants to do.ADD_ITEM → Add product
INCREASE_QUANTITY → Increase quantity
REMOVE_ITEM → Remove product
ADD_ITEM Logic : id.quantity by 1.quantity: 1.Create the reducer logic for Increasing item quantity
2
  case "INCREASE_QUANTITY":
      return state.map((item) =>
        item.id === action.payload
          ? {
              ...item,
              quantity: item.quantity + 1
            }
          : item
);+ button.state contains the current cart items.map() goes through each item in the cart and creates a new array....item keeps all the existing product information.1.Create the reducer logic for Decreasing item quantity
3
  case "DECREASE_QUANTITY":
      return state
        .map((item) =>
          item.id === action.payload
            ? {
                ...item, quantity: item.quantity - 1
              }
            : item
        )
        .filter(
          (item) => item.quantity > 0
);− button.payload contains the ID of the product whose quantity should decrease.map() checks every item in the cart and compares its ID with the selected product ID.Create the reducer logic for Removing item
4
 case "REMOVE_ITEM":

      return state.filter(
        (item) => item.id !== action.payload
);payload → contains the ID of the product to remove.filter() checks every item in the cart and creates a new array containing only the items that satisfy the condition.Create the reducer logic for clear cart
5
case "CLEAR_CART":

      return [];
Create the reducer logic for clear cart
6
case "LOAD_CART":
  return action.payload;
 default:
      return state;
  }
}
Connect Cart State with Products
7
Pass dispatch to Products:
<Route path="/products"
  element={<Products dispatch={dispatch}/>}
/>
Make Add to Cart Functional
8
<button className="add-cart-button"
  onClick={() => {
    dispatch({ type: "ADD_ITEM", payload: product });
  }} > 🛒 Add to Cart
</button>function Products({ dispatch }) {filteredProducts.map()Pass cart to Cart
9
<Route path="/cart"
  element={
    <Cart
      cart={cart}
      dispatch={dispatch}
    />
  }
/>function Cart({ cart, dispatch }) {Now cart contains the products that were added through the Products page.
Task 3 : Display Cart Dynamically
<tbody>

  {/* Product 1 */}
  <tr className="cart-item-row"> ... </tr>
  {/* Product 2 */}
  <tr className="cart-item-row">  ... </tr>

</tbody>
These rows are static.
Product 1
Product 2
Product 3
Product 4Use map() to Display Cart Products
1
<tbody>
  {cart.map((item) => (
    <tr className="cart-item-row" key={item.id}>
      <td>
        <div className="cart-product">
          <div className="cart-product-image">
            <img src={item.image} alt={item.name} />
          </div>
<div className="cart-product-info">
<h3>{item.name}</h3>
<p className="cart-category">{item.category}</p>
</div>
</div>
</td>
<td>
<div className="cart-price">
<strong>₹{item.price.toLocaleString("en-IN")}</strong>
<span className="original-price">₹{item.originalPrice.toLocaleString("en-IN")}
</span>
</div>
</td>
<td>
<div className="quantity-control">
<button type="button">−</button>
<span>{item.quantity}</span>
<button type="button">+</button>
</div>
</td>
<td>
<strong className="item-total">
₹{(item.price * item.quantity).toLocaleString("en-IN")}
</strong>
</td> <td>
<button type="button" className="delete-btn">
<img src="/icons/delete-icon.png" alt="Delete" />
</button>
</td>
</tr>
))}
</tbody>Notice what is happening
<h3>{item.name}</h3> which comes from the cart state.Add Quantity controls and delete button
2
Now that products are being displayed dynamically, we will make the − and + buttons functional.
 <button type="button"
    onClick={() =>
      dispatch({ type: "INCREASE_QUANTITY",
      payload: item.id })
    }
  >
    +
  </button>
<button type="button"
onClick={() =>
dispatch({ type: "DECREASE_QUANTITY",
payload: item.id })
}
>
−
</button>
<button type="button" className="delete-btn"
  onClick={() =>
    dispatch({ type: "REMOVE_ITEM", payload: item.id})
  }
>
<img src="/icons/delete-icon.png" alt="Delete"/>
</button>
<button type="button" className="clear-cart-btn"
onClick={() =>
dispatch({
type: "CLEAR_CART"
})
}>
<img src="/icons/clear-cart.png" alt=""/>
Clear Cart
</button>Add Clear Cart
3
Calculate Cart Amounts
4
Add this inside Cart.jsx, before the return:
const subtotal = cart.reduce(
  (total, item) =>
    total +
    Number(item.price.replace(/,/g, "")) * item.quantity,
  0
);2. Calculate Discount
 let discountPercentage = 0;

  if (subtotal >= 5000) {
    discountPercentage = 25;
  }
else if (subtotal >= 3500) {
    discountPercentage = 20;
  }
else if (subtotal >= 2000) {
    discountPercentage = 10;
  }

  const discount =
    subtotal * discountPercentage / 100;
3. Calculate Shipping
const shipping =
  subtotal >= 499 || subtotal === 0
    ? 0
    : 40;
4. Calculate total amount
const totalAmount = subtotal - discount + shipping;Connect Order Summary Dynamically
5
const shipping =
  subtotal >= 499 || subtotal === 0
    ? 0
    : 40;
Task 4 : Show Order Placed Successfully Popup
Add Popup State
1
At the top of Cart.jsx, import useState.
import React, { useState } from "react";Then, inside the component :
const [orderPlaced, setOrderPlaced] = useState(false);orderPlaced = false So the popup is not visible.Handle Proceed to Checkout
2
<button type="button" className="checkout-btn"
  onClick={() => setOrderPlaced(true)} > Proceed to Checkout
  <span>→</span>
</button>
Add onClick event to the button
Create the Popup UI
3
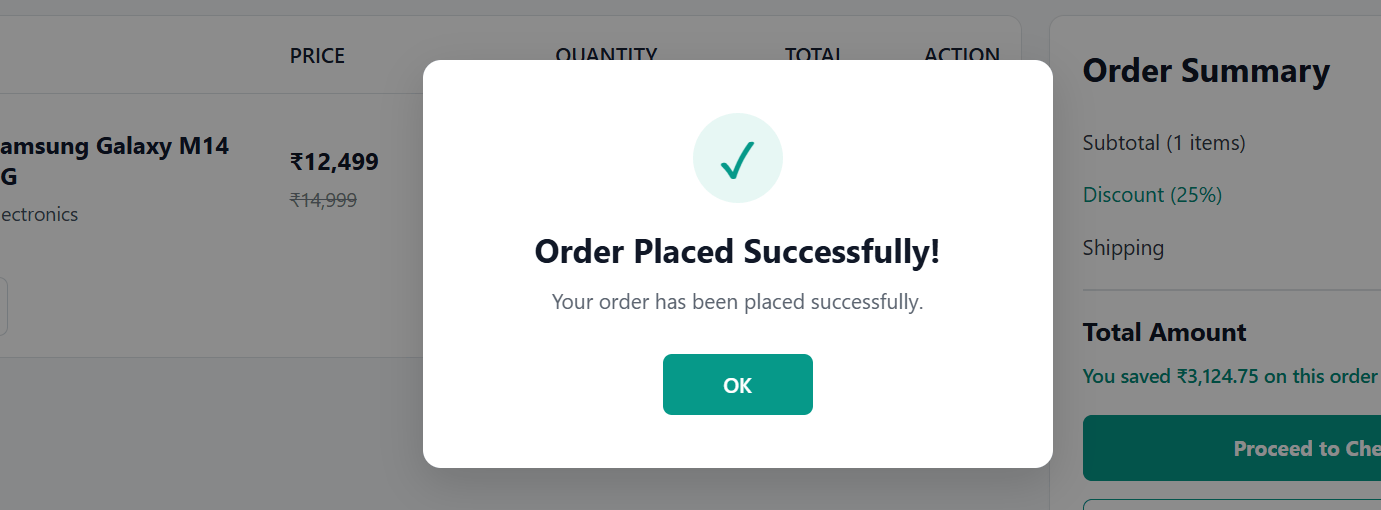
{orderPlaced && (

  <div className="order-popup-overlay">
    <div className="order-popup">
      <div className="success-icon"> ✓ </div>
      <h2> Order Placed Successfully!</h2>
      <p>  Your order has been placed successfully. </p>
      <button type="button" className="popup-ok-btn"
      onClick={() => setOrderPlaced(false)} > OK
      </button>

    </div>
  </div>
)}.cart-page, before its closing </div>.Add Popup CSS
4
Add this to your existing Cart.css:
Task 5 : Introduce Empty Cart UI
Add Conditional Rendering
1
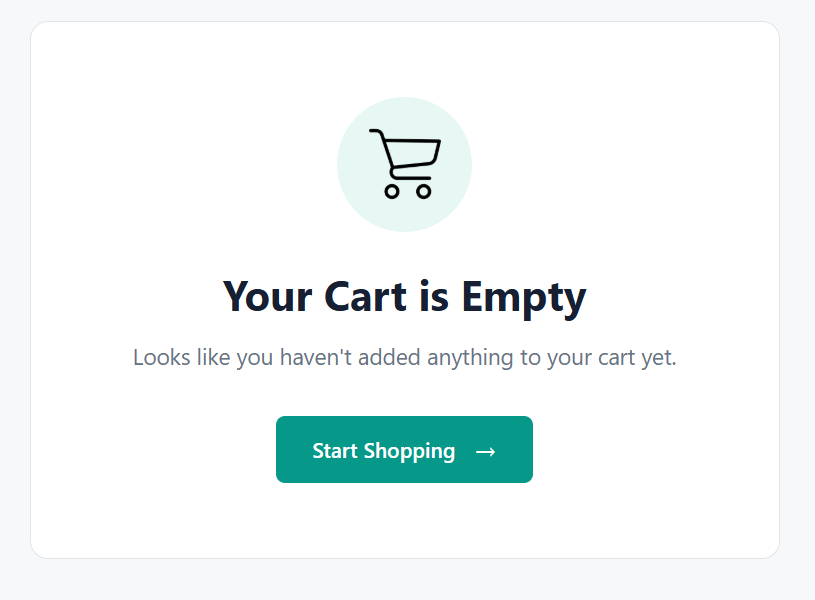
{cart.length === 0 ? (
  <div className="empty-cart">
        <div className="empty-cart-icon">
      🛒
    </div>

    <h2> Your Cart is Empty </h2>

    <p> Add some products to your cart
      to continue shopping.
    </p>

    <Link to="/products" className="continue-shopping-btn">
      Continue Shopping
    </Link>

  </div>
) : (
<>
{/* Cart Table */}
{/* Order Summary */}
</>
)}Style the Account Section
2
Connect Cart Count to Navbar
3
function Navbar({userName, cart =[]}) {const cartCount = cart.reduce(
(total, item) =>
total + item.quantity,
0
);<span className="cart-count">
{cartCount}
</span>Pass Cart State to Navbar
4
App.jsx, pass the cart state to the Navbar component:<Navbar
userName={userName}
cart={cart}
/>Task 6 : Make Cart data Persistent
Create the cartLoaded State
1
Add the following after the cart reducer:
const [cartLoaded, setCartLoaded] = useState(false);cartLoaded keeps track of whether the saved cart has been restored from LocalStorage.cartLoaded = falseThis means: "The cart has not been loaded from LocalStorage yet."
setCartLoaded(true);Use cartLoaded During Cart Restoration
2
useEffect(() => {
  const savedCart = localStorage.getItem("cart");
  if (savedCart) {
    dispatch({ type: "LOAD_CART", payload: JSON.parse(savedCart)
    });
      }
  setCartLoaded(true);
}, []);
Use cartLoaded Before Saving
3
useEffect(() => {

  if (!cartLoaded) {

    return;

  }

  localStorage.setItem(
    "cart",
    JSON.stringify(cart)
  );


}, [cart, cartLoaded]);We are done with this lab. The latest source code has been uploaded to GitHub. You can access the latest commit using the link below:
Great job!
Your ShopKart Shopping Cart & LocalStorage is now working smoothly with product management, quantity controls, order calculations, cart persistence, and checkout confirmation.
Checkpoint
Git Push
git push origin branchNameNext-Lab Preparation
Module:
1) Handling Side-Effects
2) React Context & Reducers
By Content ITV