ANGULAR
FRAMEWORKS
FRONT
UN , ¿FREIM WORK?
Conjunto de herramientas, librerías y/o técnicas que nos permiten resolver un problema de una manera más elegante, sencilla y que nos permitirá resolver problemas nuevos similares de la misma manera.
Muchos frameworks nos proporcionan una estructura del proyecto ha seguir y siempre la misma, muchos framworks nos facilitan resolver problemas comunes de manera sencilla (digamos que, como jquery lo hacía con la manipulación del dom) etc etc
La web se vuelve muy dinámica
Tanto, que ya no se le llaman webs, y nace el concepto de
WEBAPPS
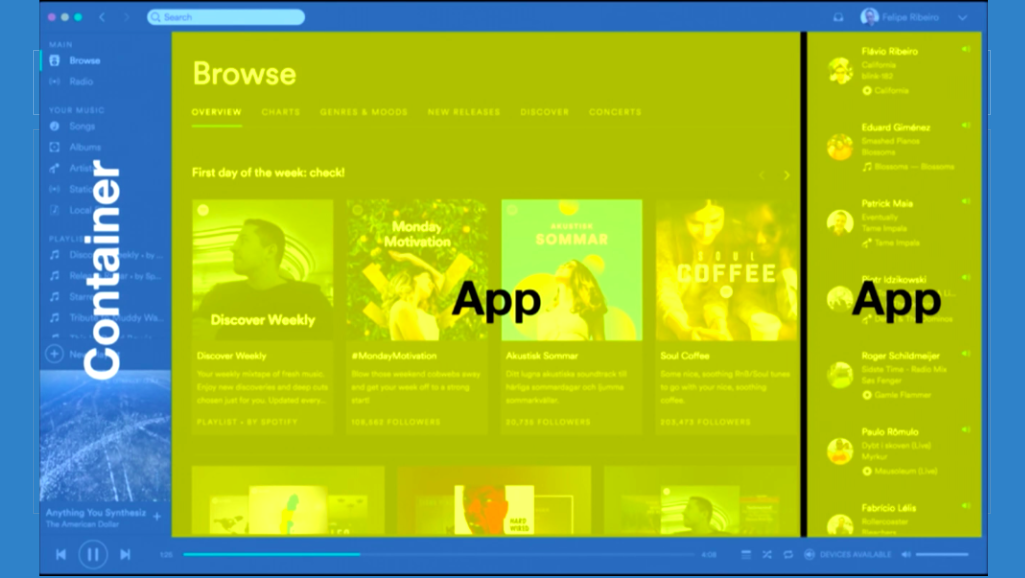
FACEBOOK, WHATSAPP WEB, SPOTIFY, APLICACIONES MÓVILES HÍBRIDAS, APLICACIONES DE ESCRITORIO CON ELECTRON
La web se vuelve muy dinámica
Cada vez más:
- Tenemos miles de botones en la pantalla
- No queremos que se refresque la pantalla cuando el usuario le de a una categoría
- Queremos que las búsquedas sean instantaneas
AJAX
webapps
Ejemplos WebApps y SPA


Ejemplos WebApps y SPA
Ejemplos WebApps y SPA
OJO, clara diferencia entre SPA y no SPA

También nace el concepto de:
Single Page Application <=> SPA
index.html
<div>
</div>
Ordenador usuario
Servidor facebook
== DAME EL index.HTML =>
<= Toma el index.html ==
== El usuario navega a categories.html =>
Web estática ( NO SPA )
Se refresca la pantalla
== NAVEGO a categorias.html =>
<= Toma el categorias.html ==
Se refresca la pantalla
Dame todos los ficheros
Toma los scripts y los css
Dame todos los ficheros
Toma los scripts y los css
Ordenador usuario
Servidor facebook
== DAME EL index.HTML =>
<= Toma el index.html ==
== El usuario navega a categories.html =>
Single Page Application
Se refresca la pantalla
NAVEGO a categorias.html
Me autosirvo el template
Me renderizo una cosa nueva
Dame todos los ficheros
Toma los scripts y los css

ng new project
npm install -g @angular/cli
ng new project

Comando new
ng new project

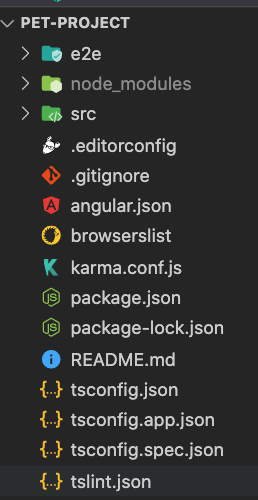
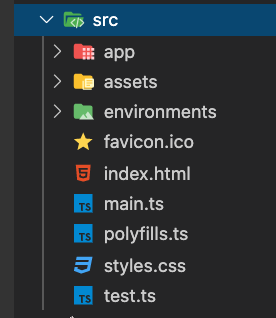
Carpeta src
Esto es lo importante
Alternativa
EN ANGULAR2+
Nos encontraremos que cada página o componente se compone de :
un fichero .html
un fichero .css
un fichero .ts
LA VISTA
EL MAQUILLAJE
LA LOGICA
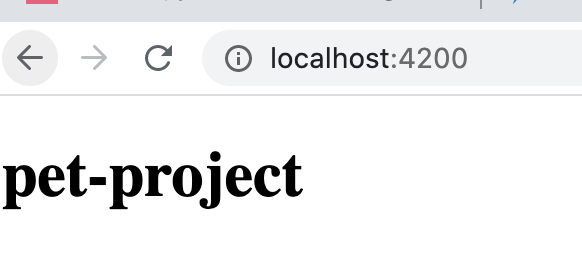
¿Cómo arrancamos nuestro proyecto?
ng serve

Localhost:4200
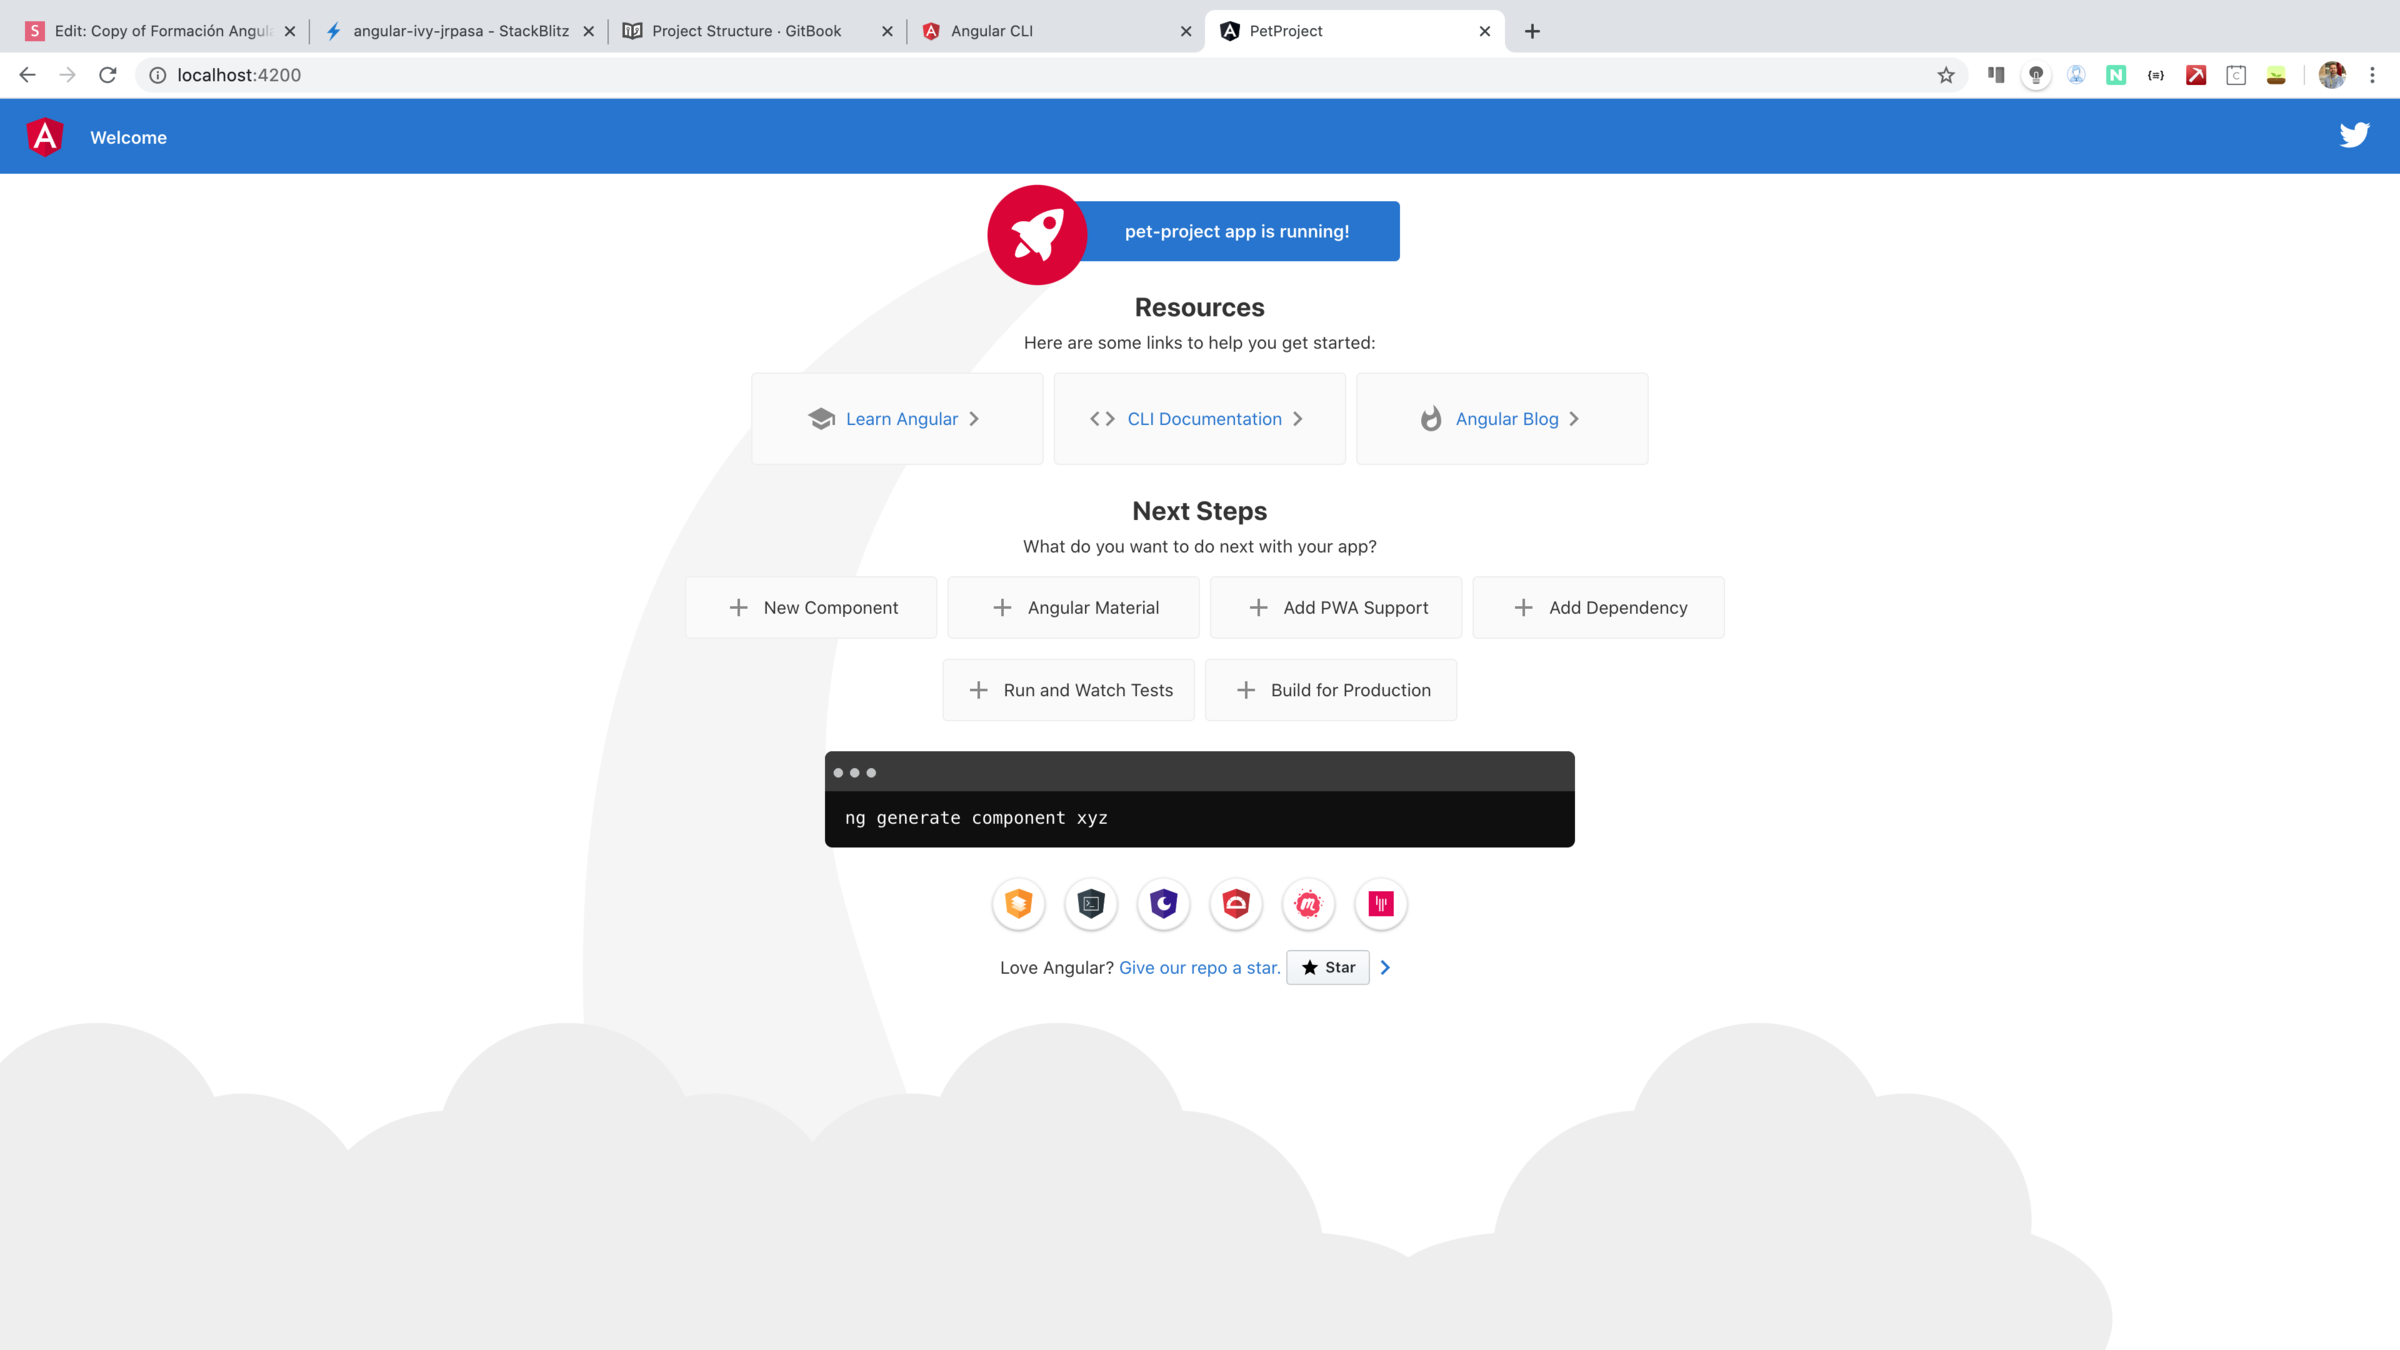
EL INDEX ESTÁ VACIOO ??
<!doctype html>
<html lang="en">
<head>
  <meta charset="utf-8">
  <title>Angular - Example</title>
  <base href="/">
  <meta name="viewport" content="width=device-width, initial-scale=1">
  <link rel="icon" type="image/x-icon" href="favicon.ico">
</head>
<body>

  <app-root></app-root>

</body>
</html>
Que vemos en localhost:4200

En el html
Mientras tanto ... en la web
Que vemos en localhost:4200
En el html
Mientras tanto ... en la web
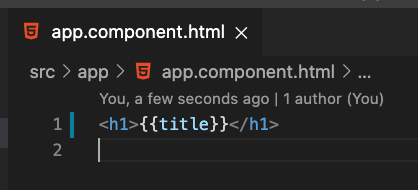
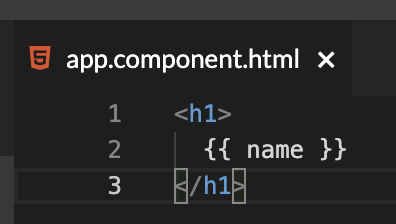
Escribamos esto en el .html
En /src/app/app.component.html
Mientras tanto ... en la web
<h1>Hola mi nombre es {{name}}</h1>
<input [(ngModel)]="name">
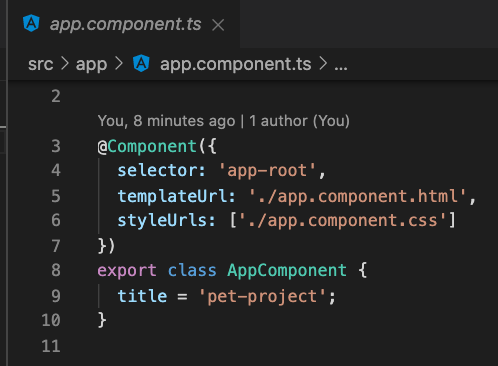
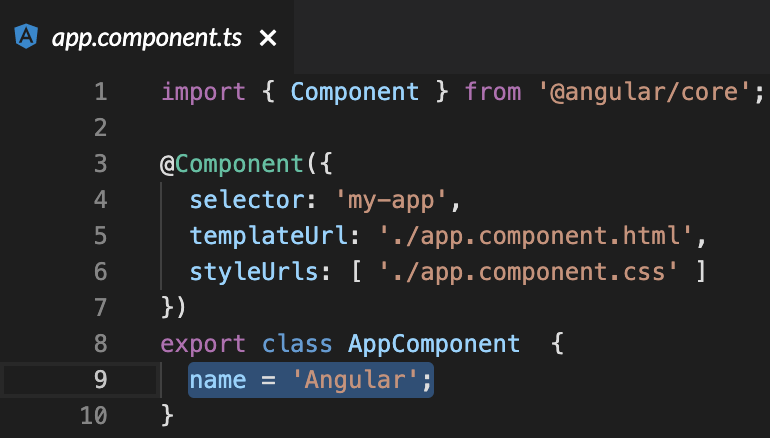
import { Component } from '@angular/core';

@Component({
  selector: 'app-root',
  templateUrl: './app.component.html',
  styleUrls: ['./app.component.css']
})
export class AppComponent
  name = 'Yunior';
}
En /src/app/app.component.ts

Escribamos esto en el .html
En /src/app/app.component.html
Mientras tanto ... en la web
<h1>Hola mi nombre es {{name}}</h1>
<input [(ngModel)]="name">
import { Component } from '@angular/core';

@Component({
  selector: 'app-root',
  templateUrl: './app.component.html',
  styleUrls: ['./app.component.css']
})
export class AppComponent
  name = 'Yunior';
}
En /src/app/app.component.ts
Todo eso de ahí se nos escribirá siempre solo, automáticamente
¿cómo harías esto en JS vanilla?
¿cómo harías esto en JS vanilla?
Paso 1
<input id="elInput" type="text">¿cómo harías esto en JS vanilla?
Paso 1
<input id="elInput" type="text">Paso 2
const selectElement = document.getElementById('elInput');

selectElement.addEventListener('change', (event) => {
    console.log(`The value is here => ${event.target.value} `)
});
¿cómo harías esto en JS vanilla?
Paso 1
<input id="elInput" type="text">Paso 2
const selectElement = document.getElementById('elInput');

selectElement.addEventListener('change', (event) => {
    console.log(`The value is here => ${event.target.value} `)
});
Paso 3
<h2> Hola mi nombre es <span id="resultado"></span></h2>¿cómo harías esto en JS vanilla?
Paso 1
<input id="elInput" type="text">Paso 2
const selectElement = document.getElementById('elInput');

selectElement.addEventListener('change', (event) => {
    console.log(`The value is here => ${event.target.value} `)
});
Paso 3
<h2> Hola mi nombre es <span id="resultado"></span></h2>Paso 4
const selectElement = document.getElementById('elInput');

selectElement.addEventListener('change', (event) => {
    const resultado = document.getElementById('resultado');
    resultado.innerText = event.target.value;
});
¿Los profes de JS .. nos sabemos todo esto de memoria?
Ahora ... con angular o cualquier framework
<h1>Hola mi nombre es {{nombre}}</h1>
<input [(ngModel)]="nombre">
2 ways data binding
¿Ficheros .ts?
TypeScript is a typed superset of JavaScript
that compiles to plain JavaScript
A superset

Javascript
- Tipado débil.
- Autocompletado ahí ahí.
- No avisa de errores.
- Navegadores viejos.
Typescript
- Tipado "fuerte"
Autocompletado si... - Avisa de problemas
- Código TS ---> JS ES6
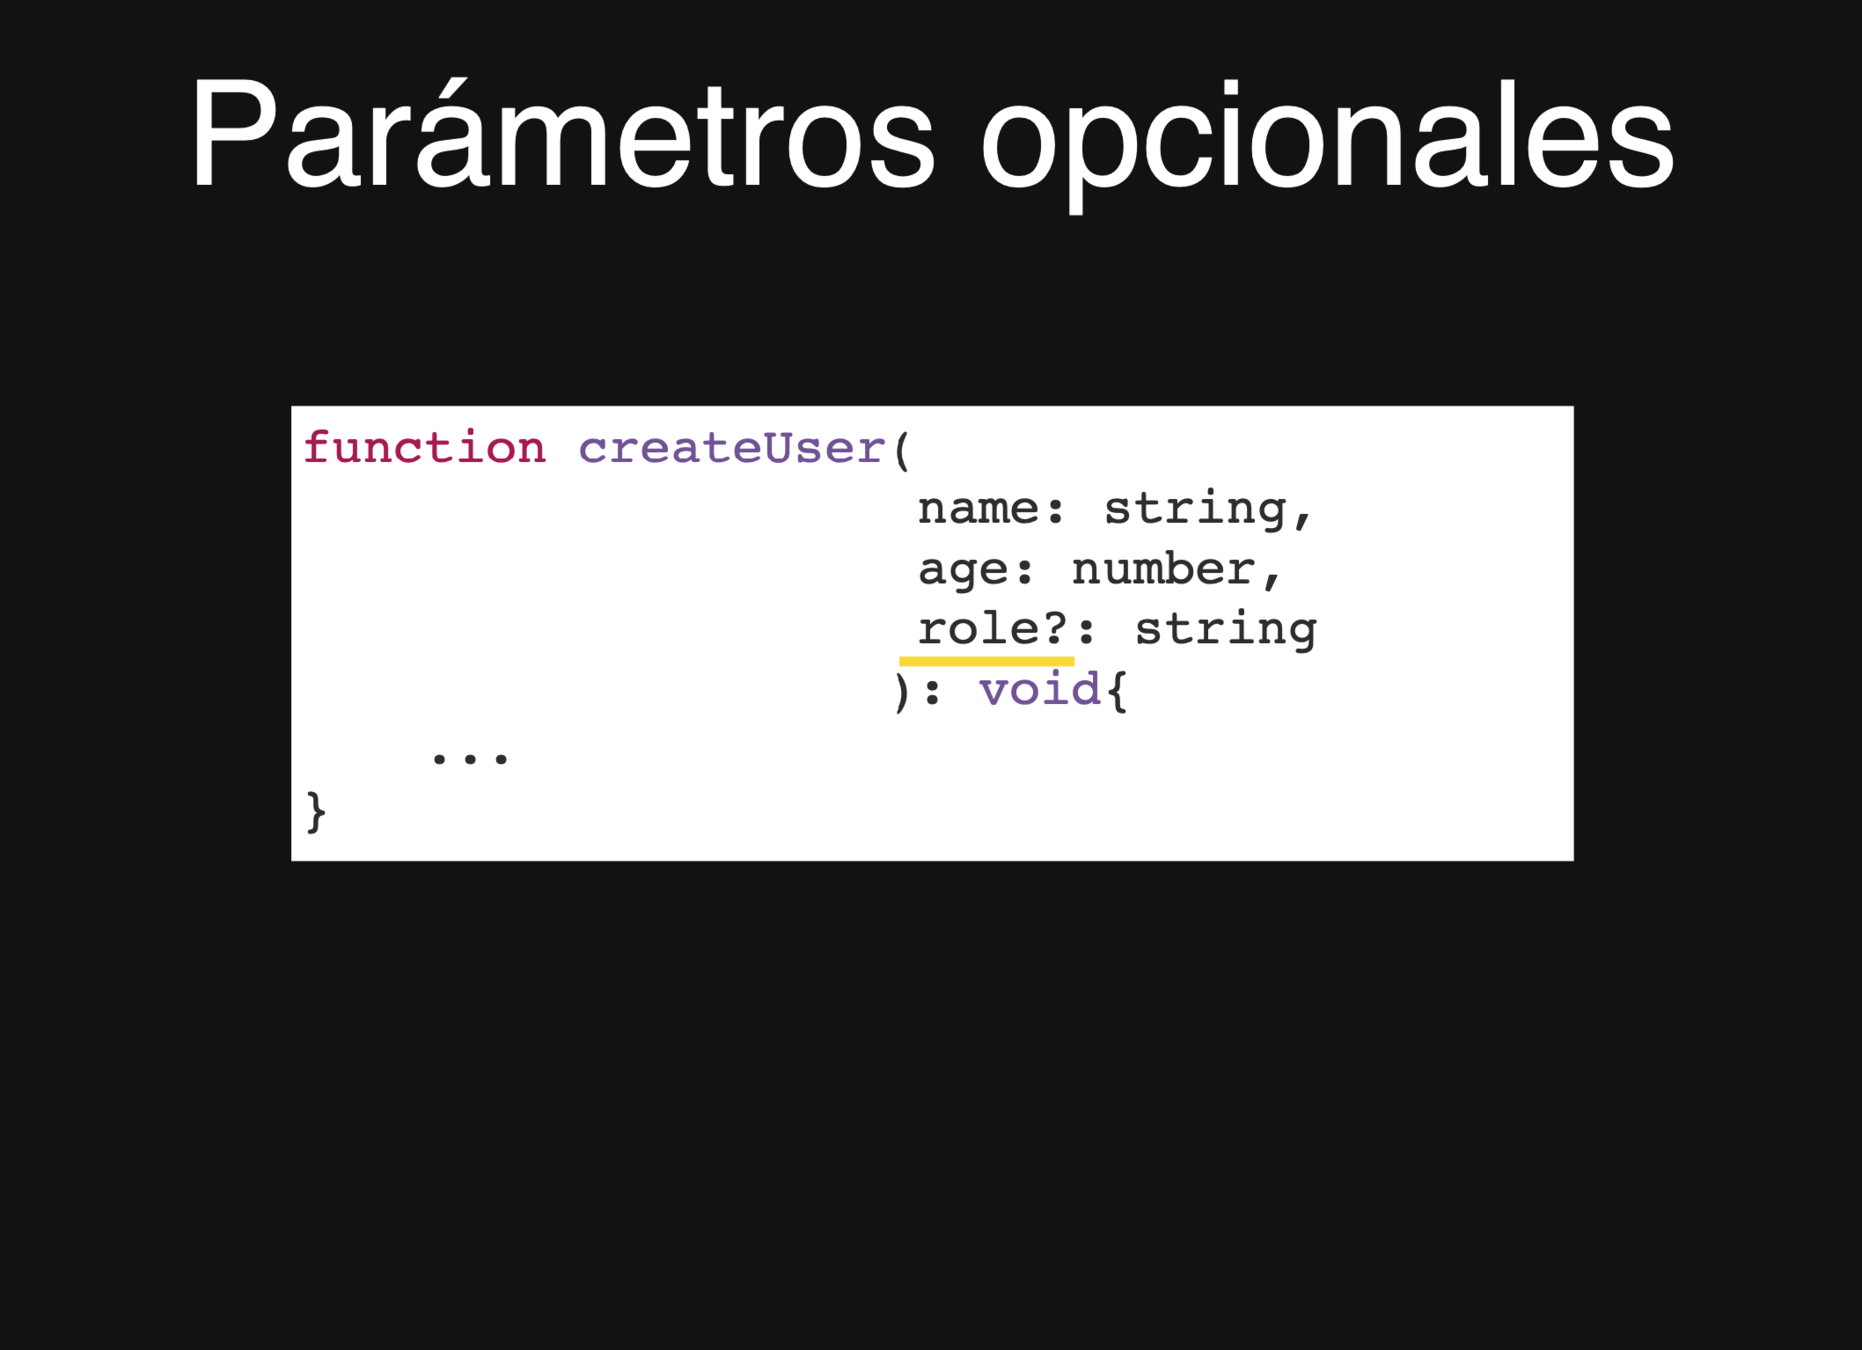
typescript
- Tipado de variables y de parámetros
- Orientado a clases
- Importar exportar clases
- Webpack
- Un largo etc
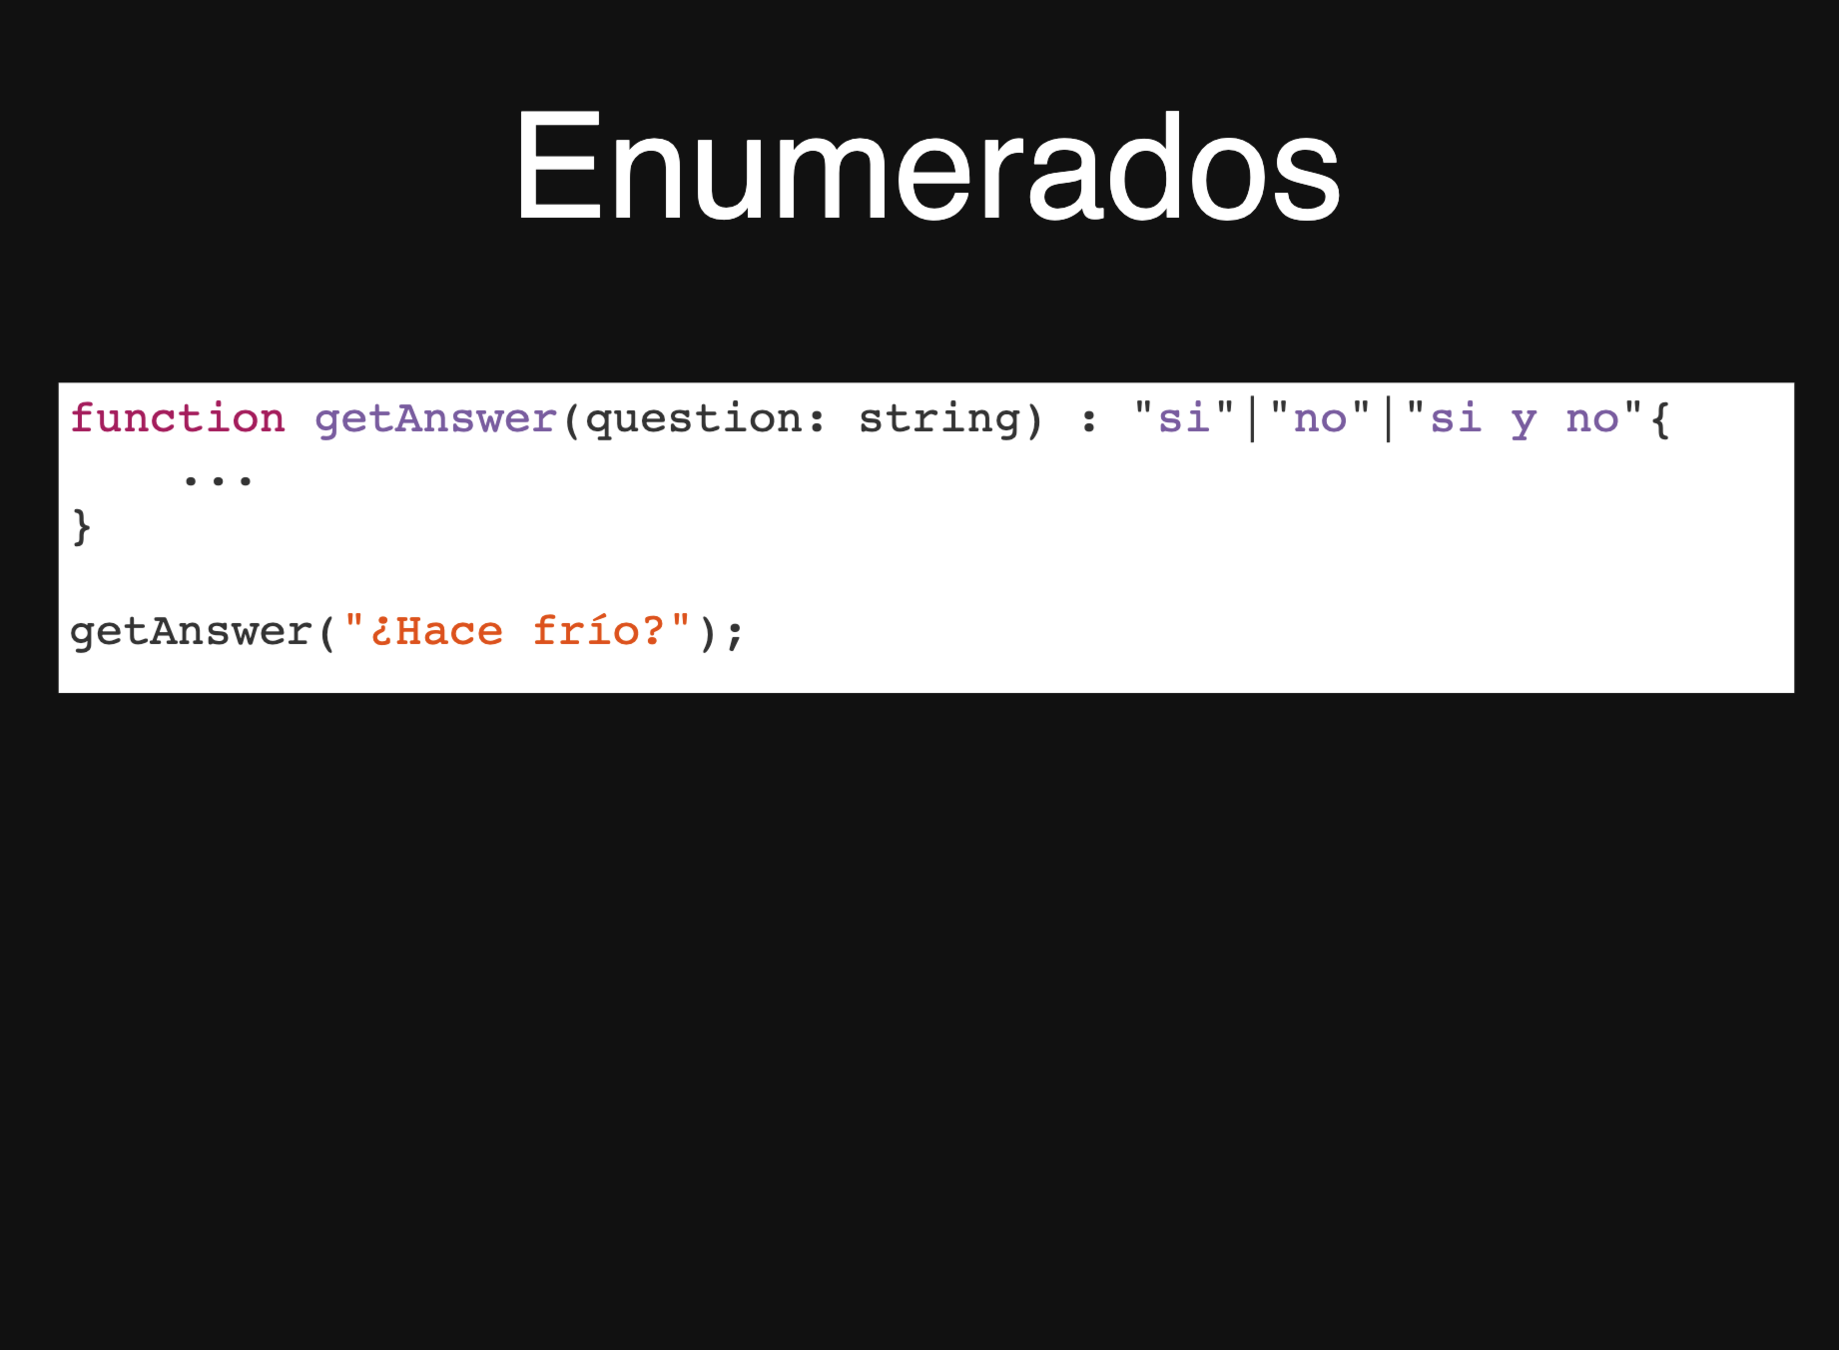
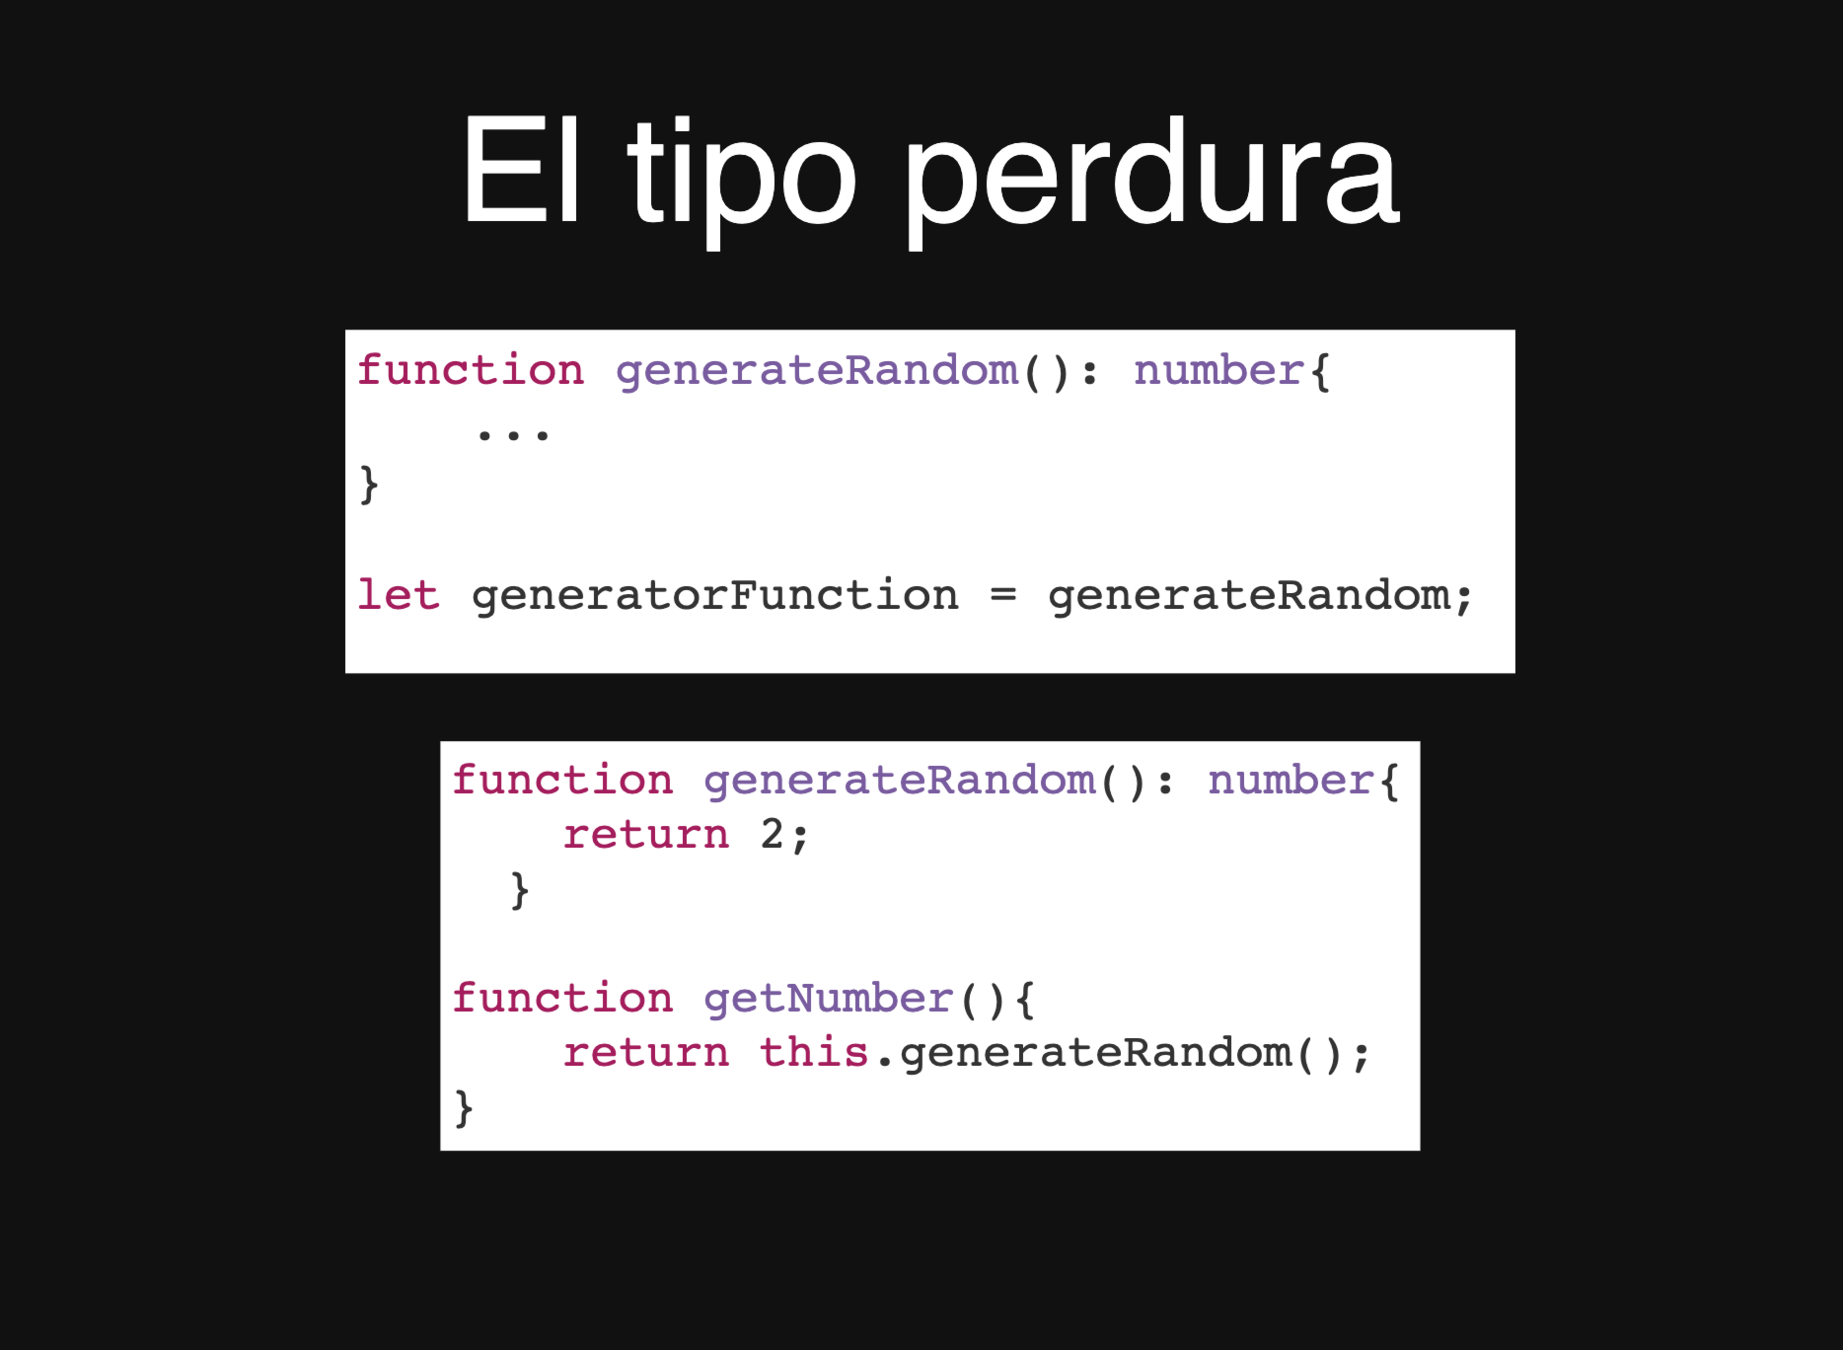
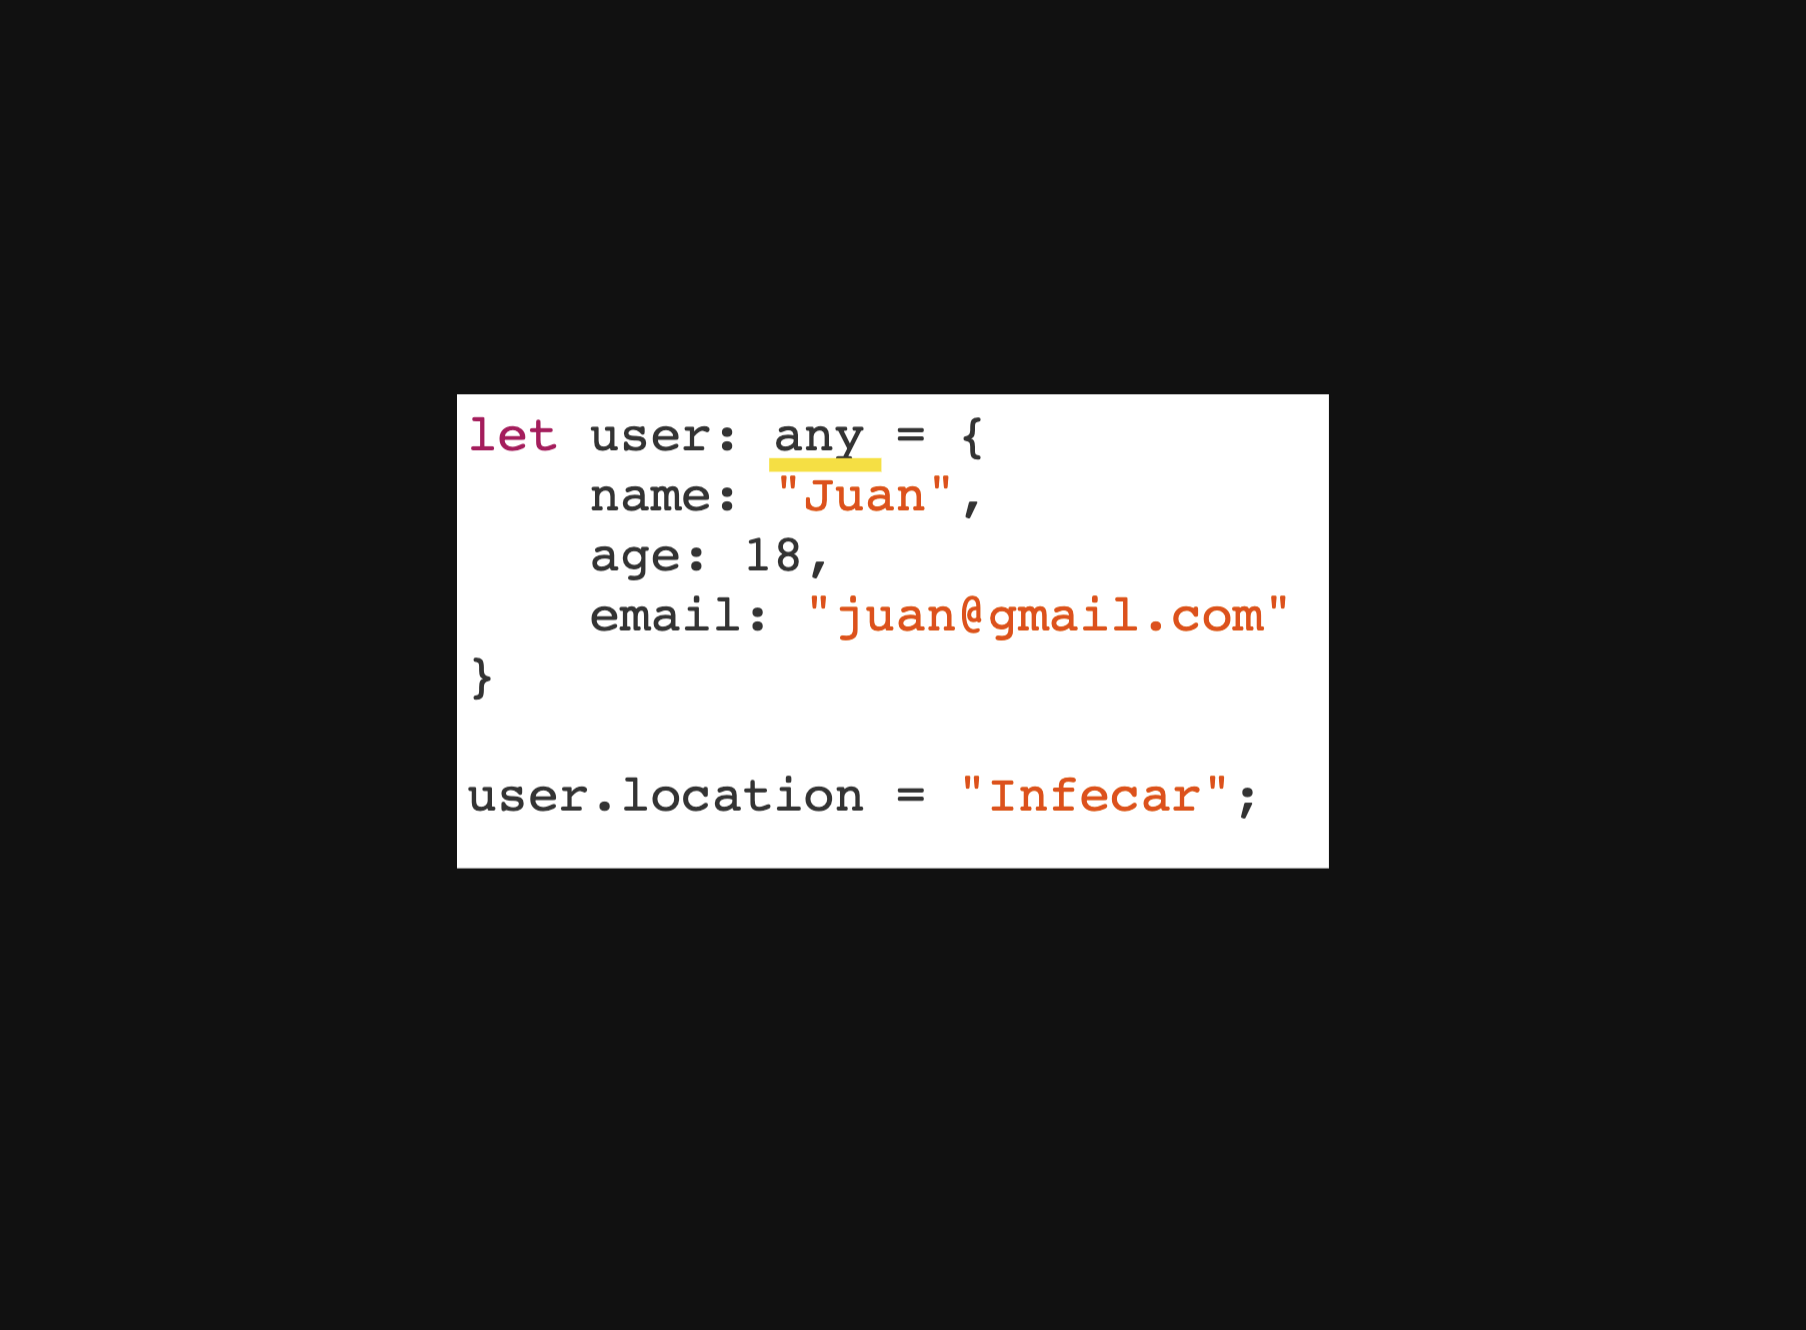
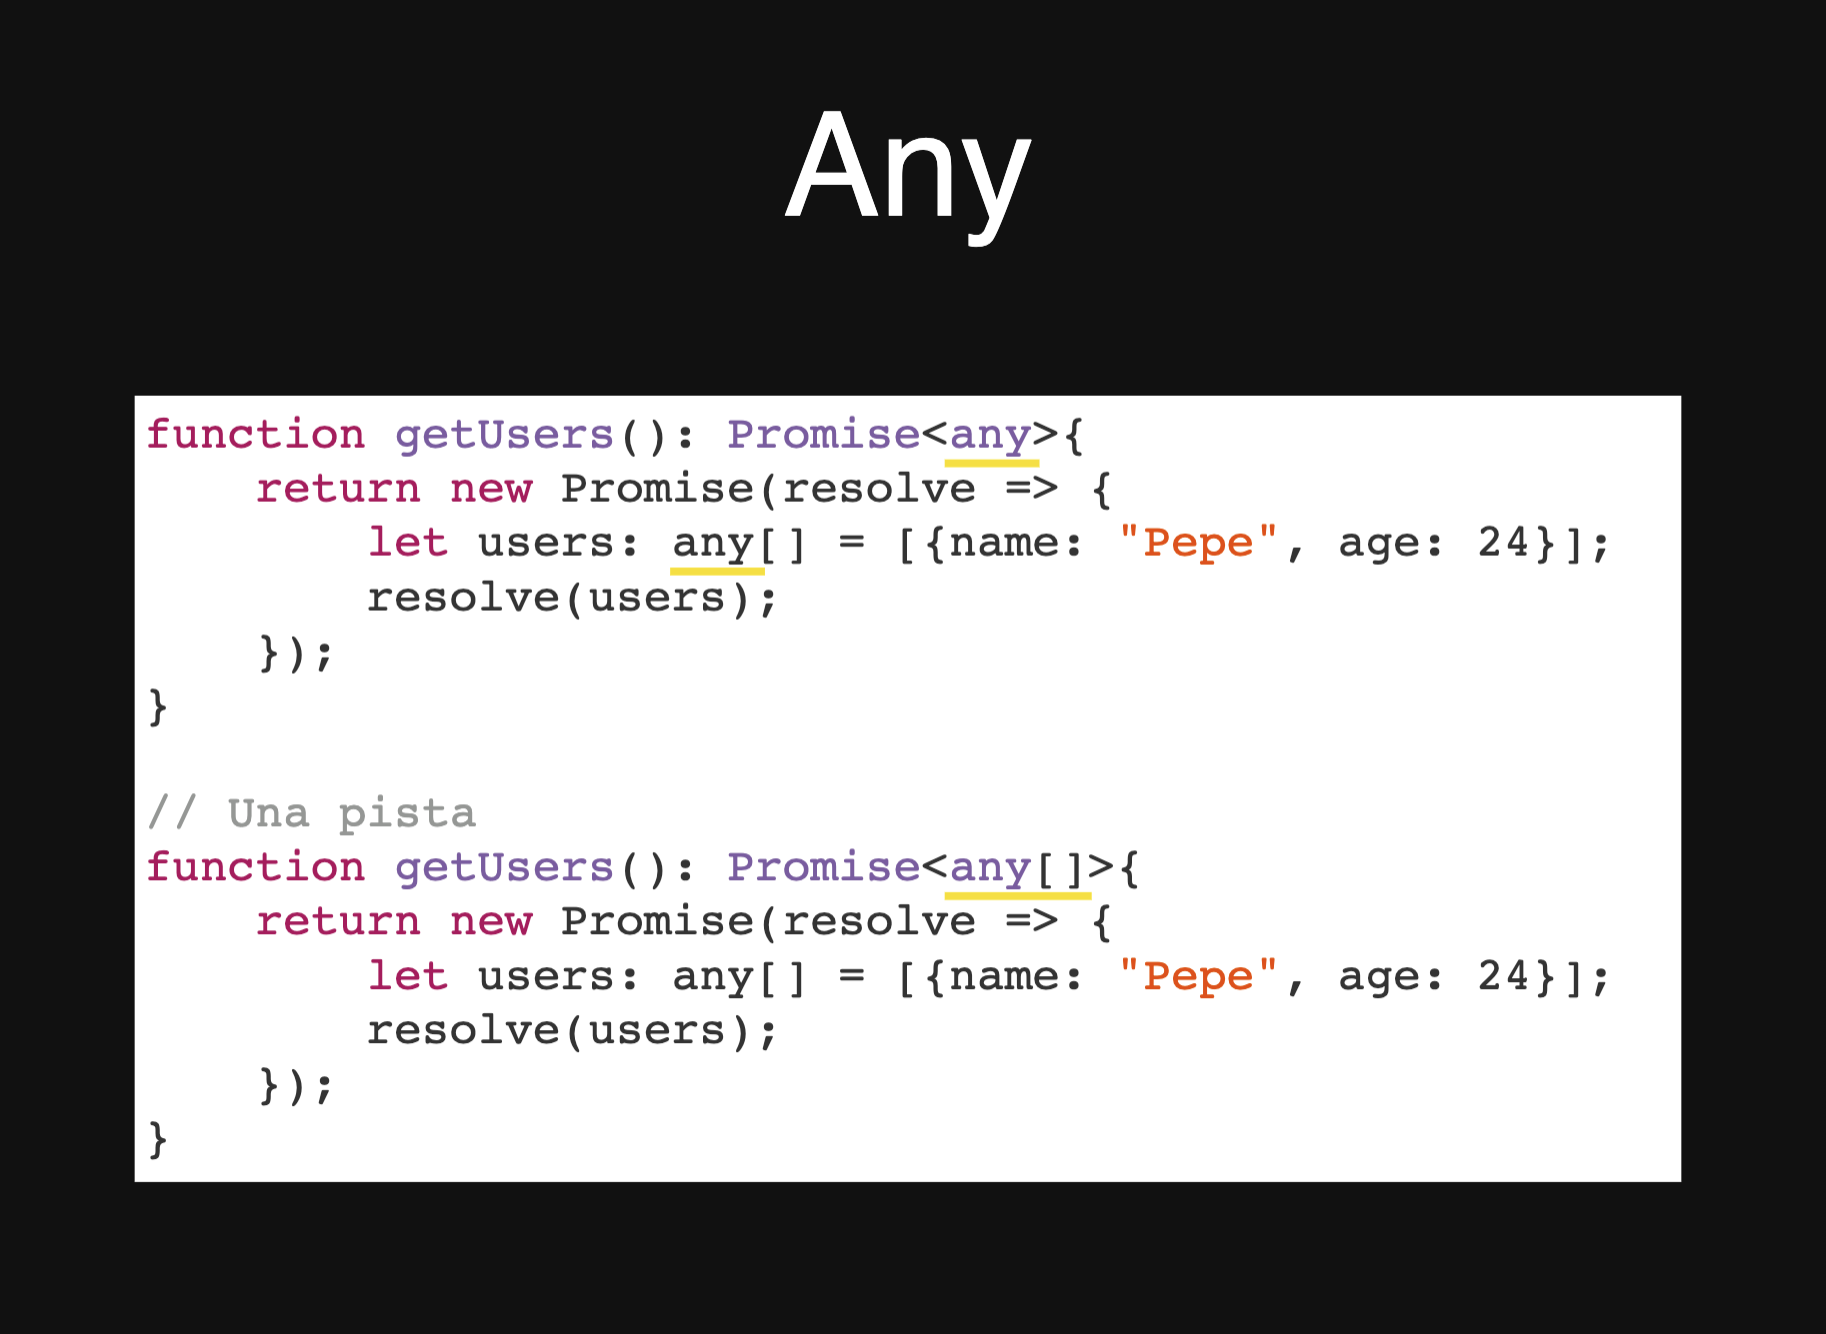
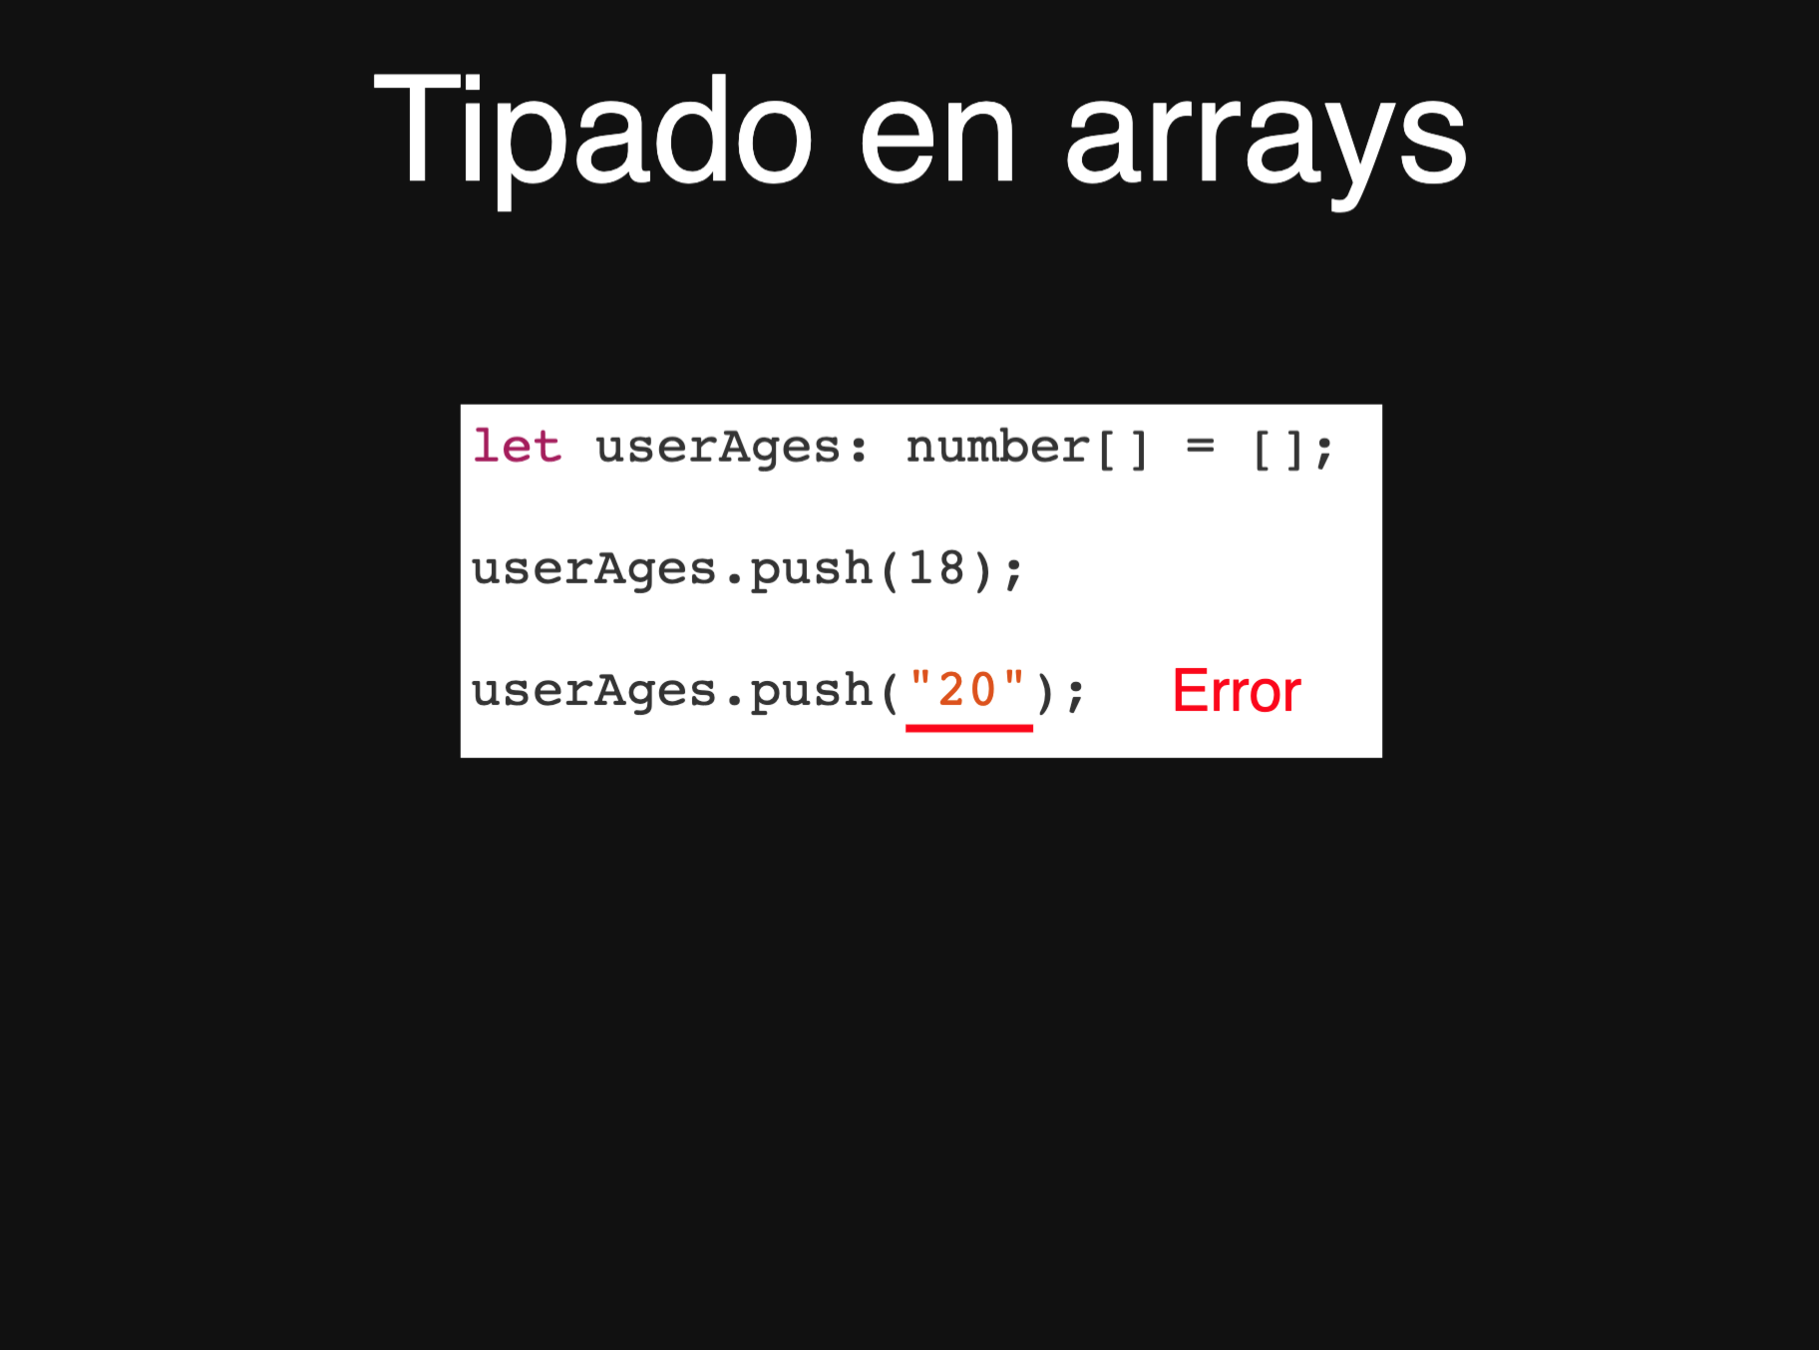
Aspectos Signicativos
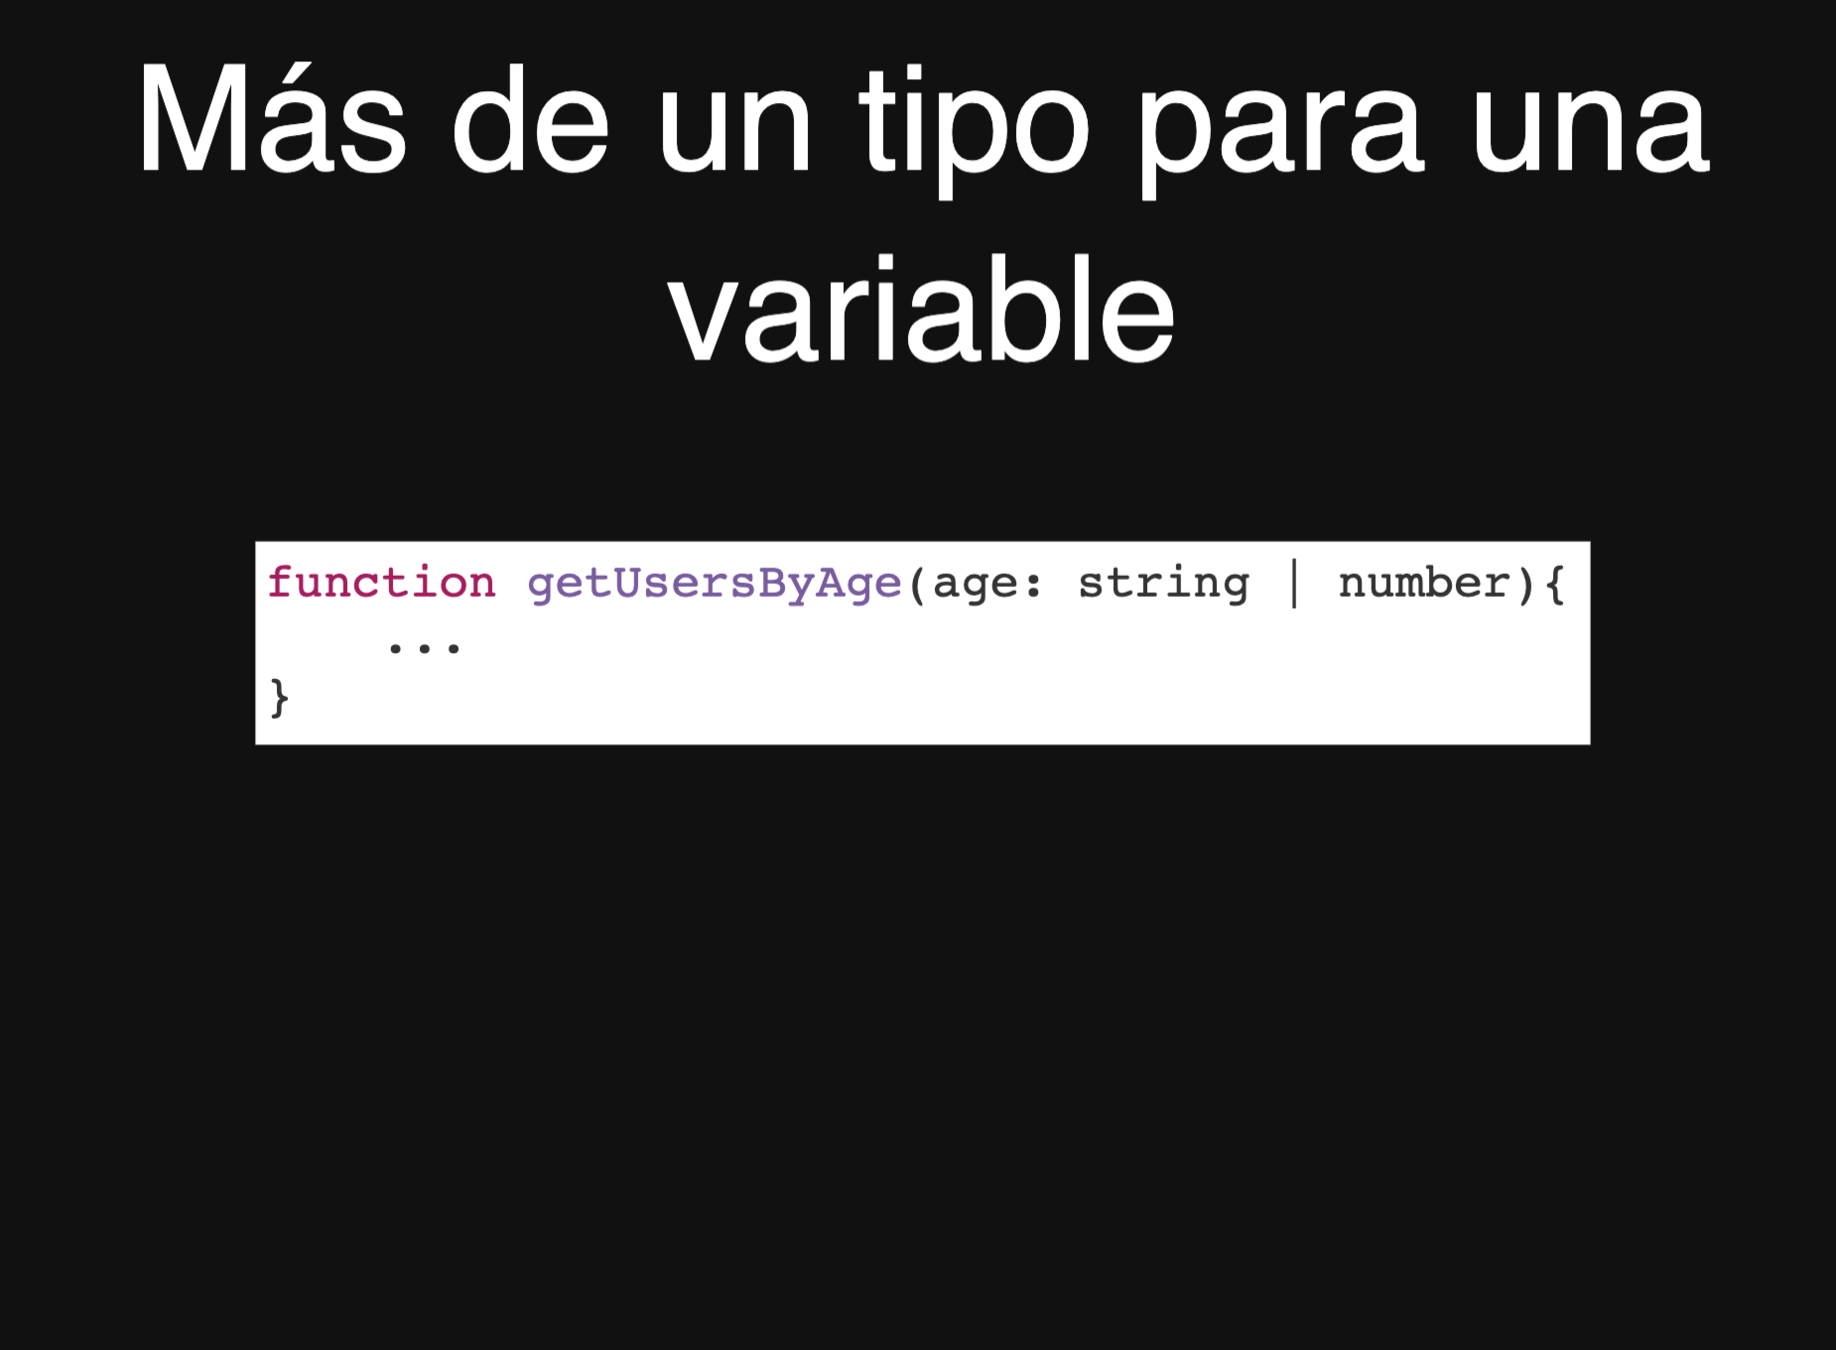
Valores de distinto tipo
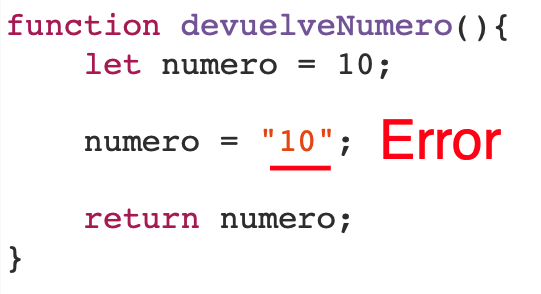
Atributos y métodos incorrectos
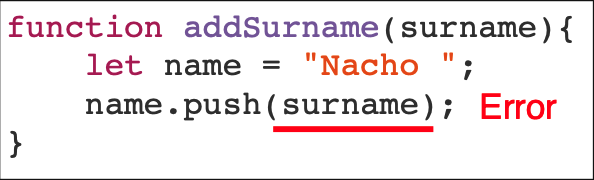
Variables no declaradas

Varios valores
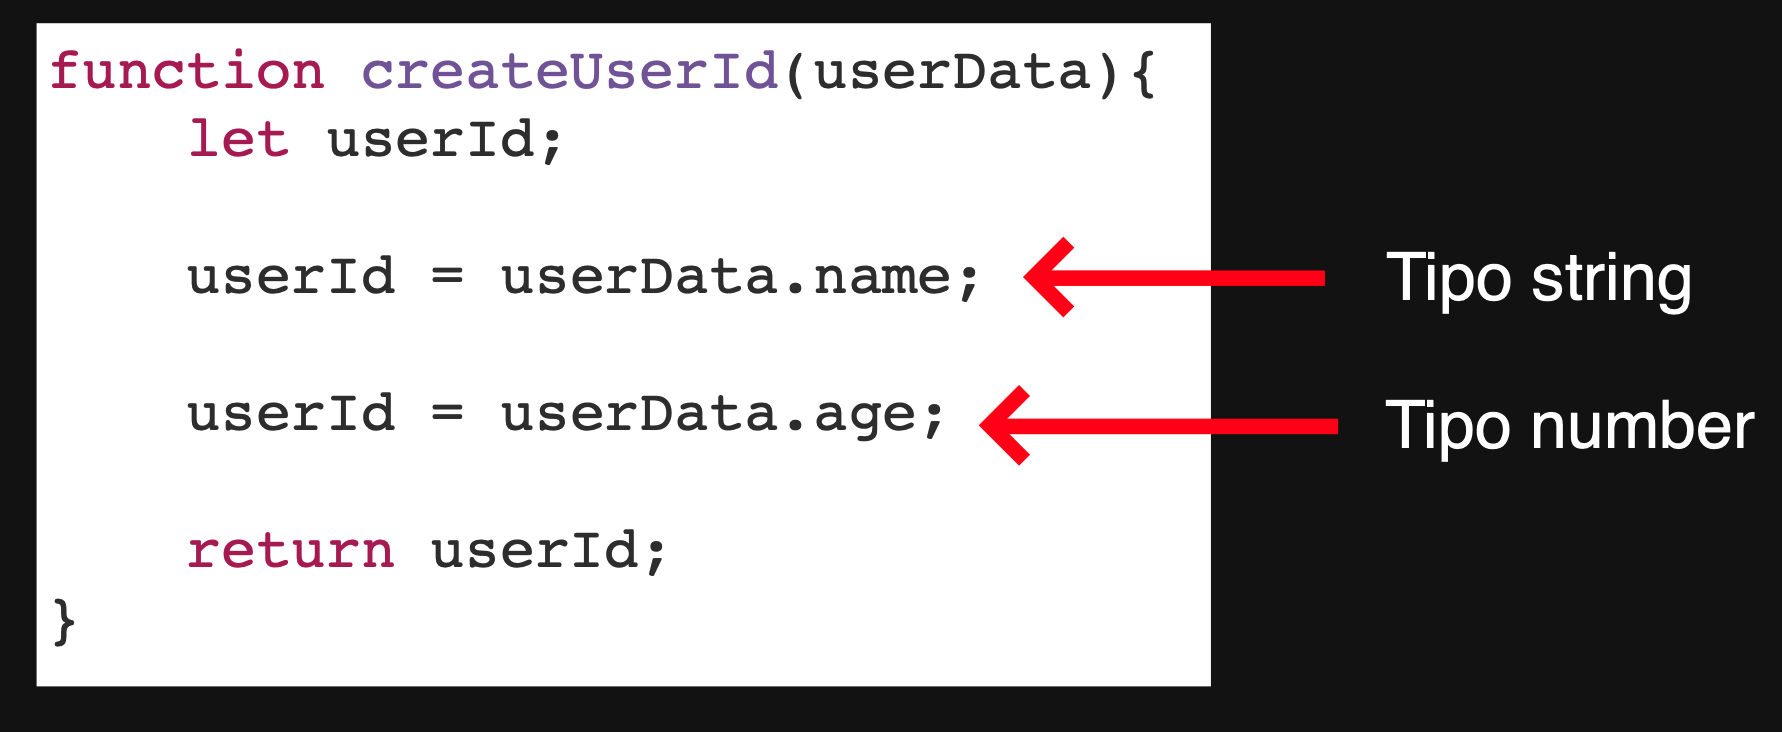

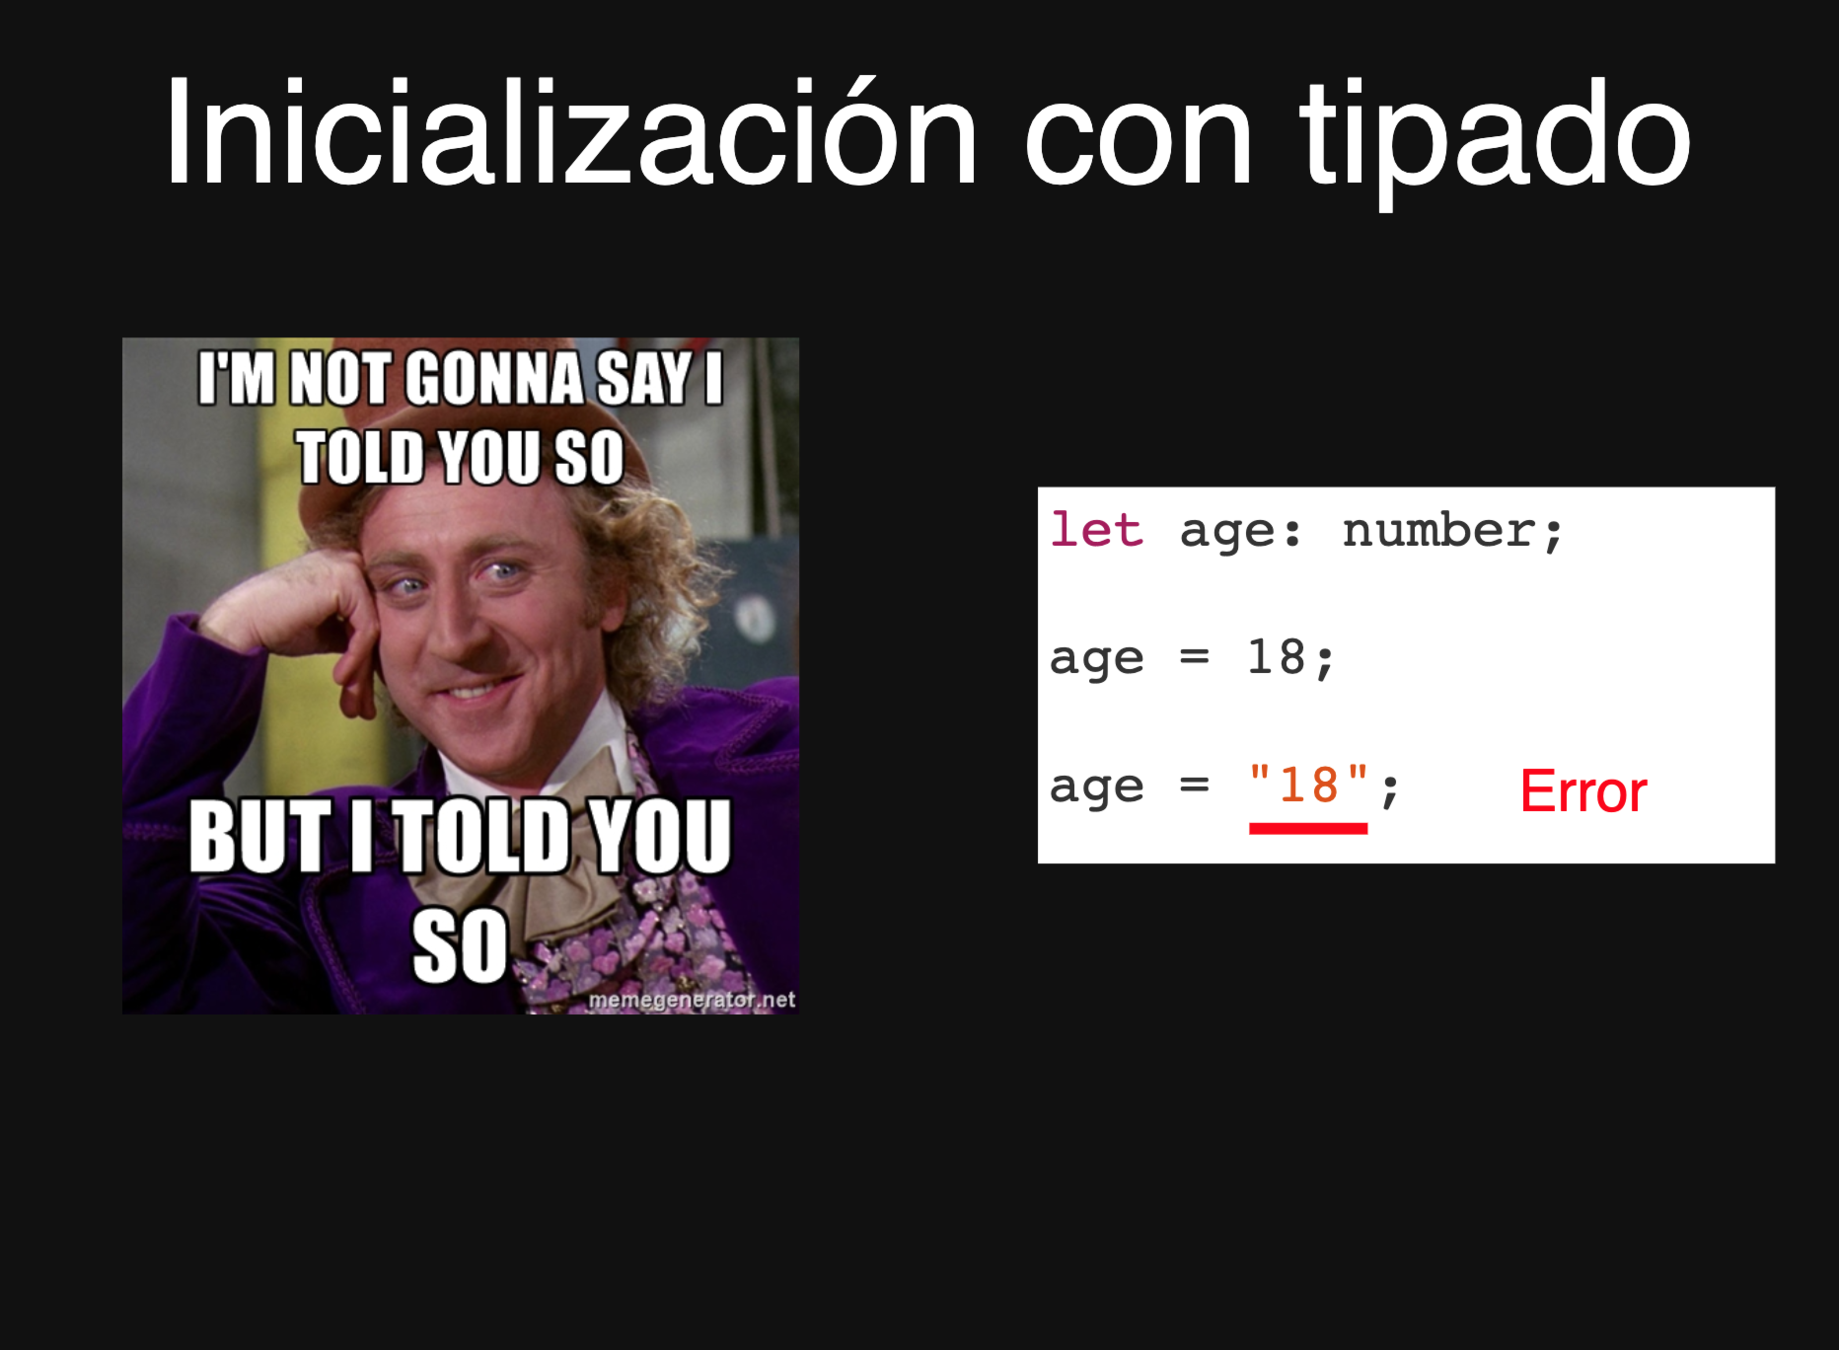

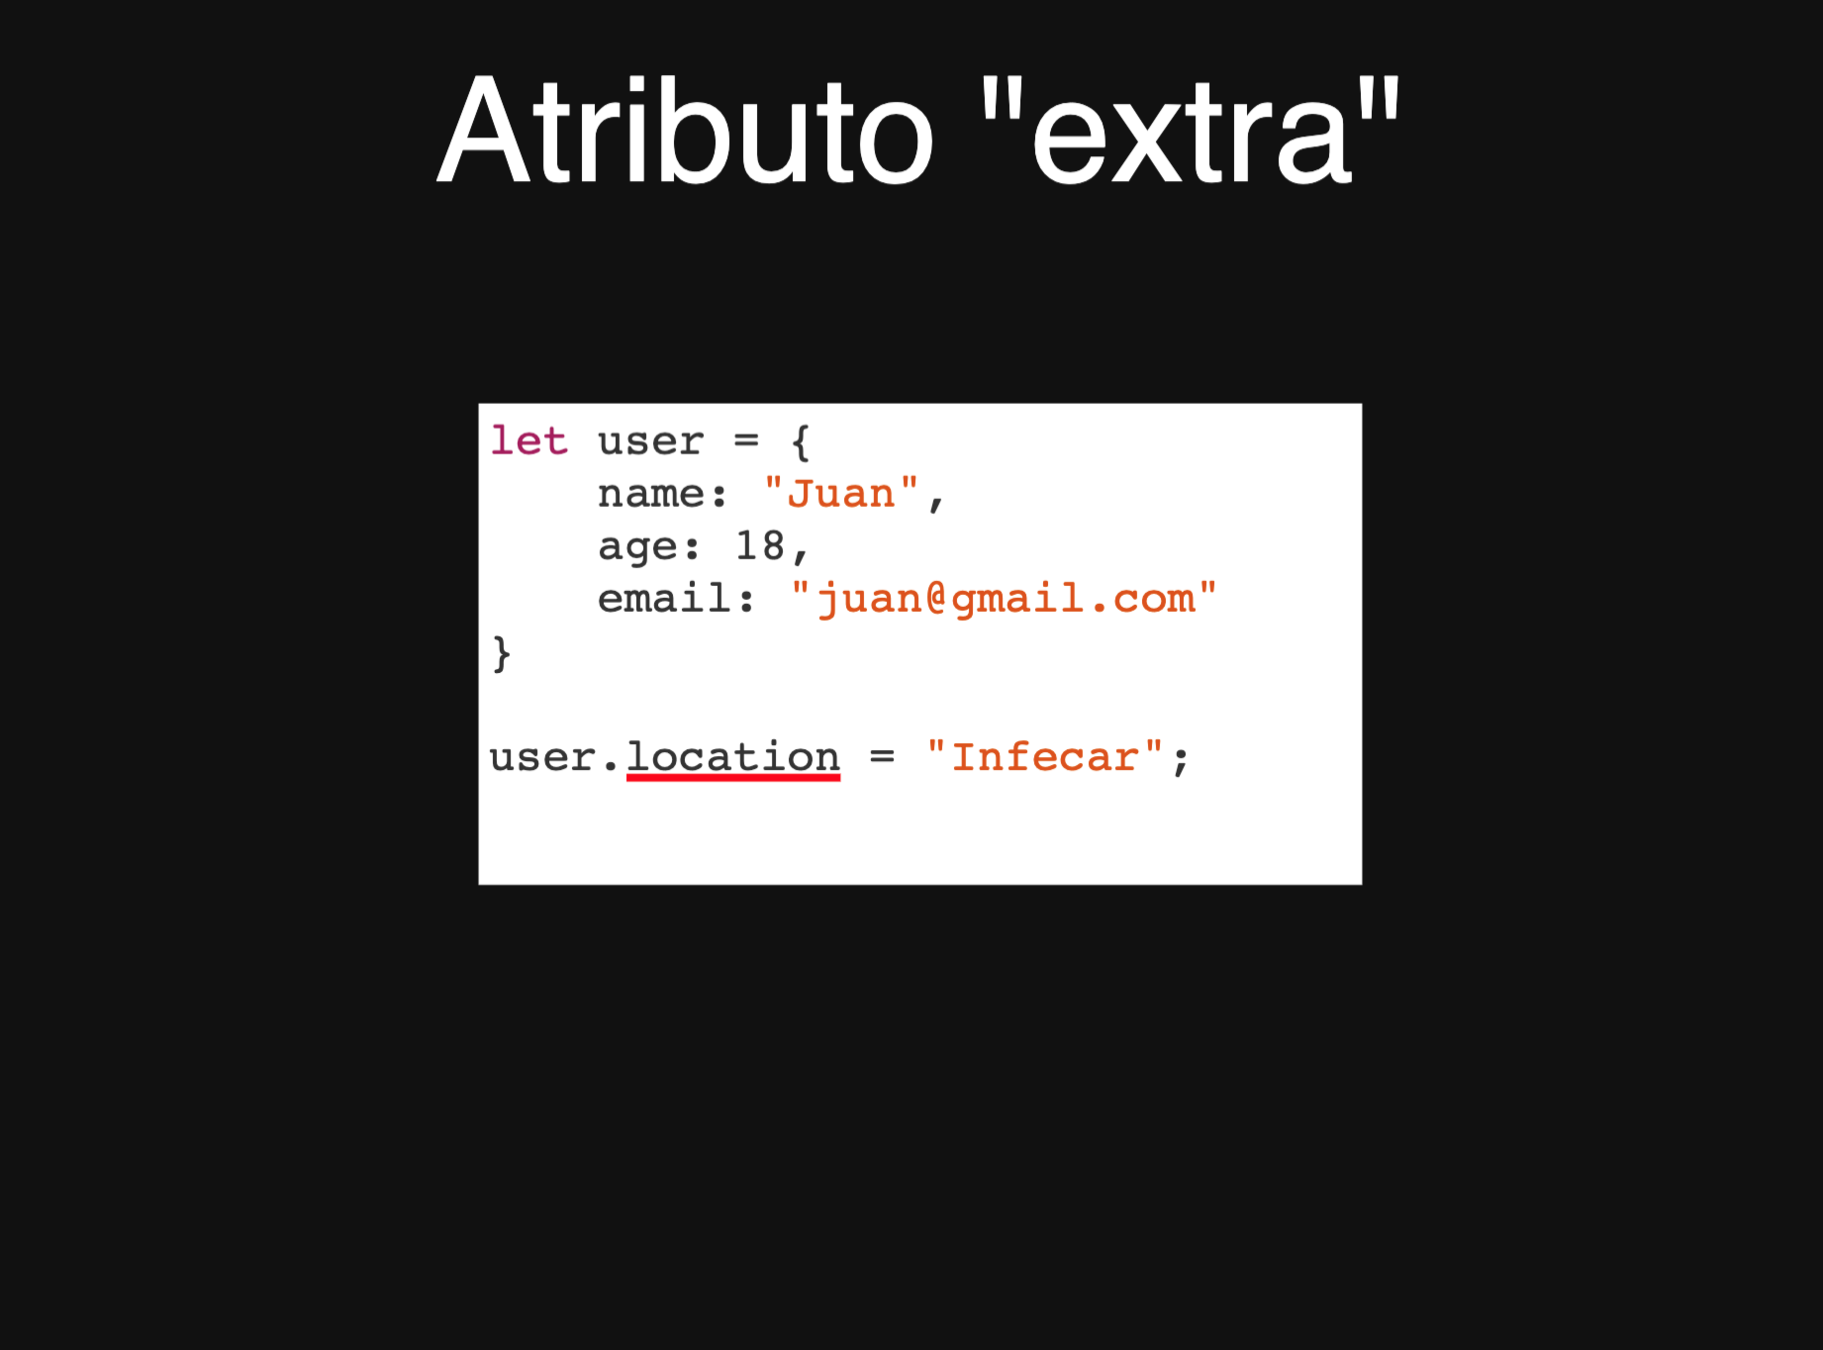
Error

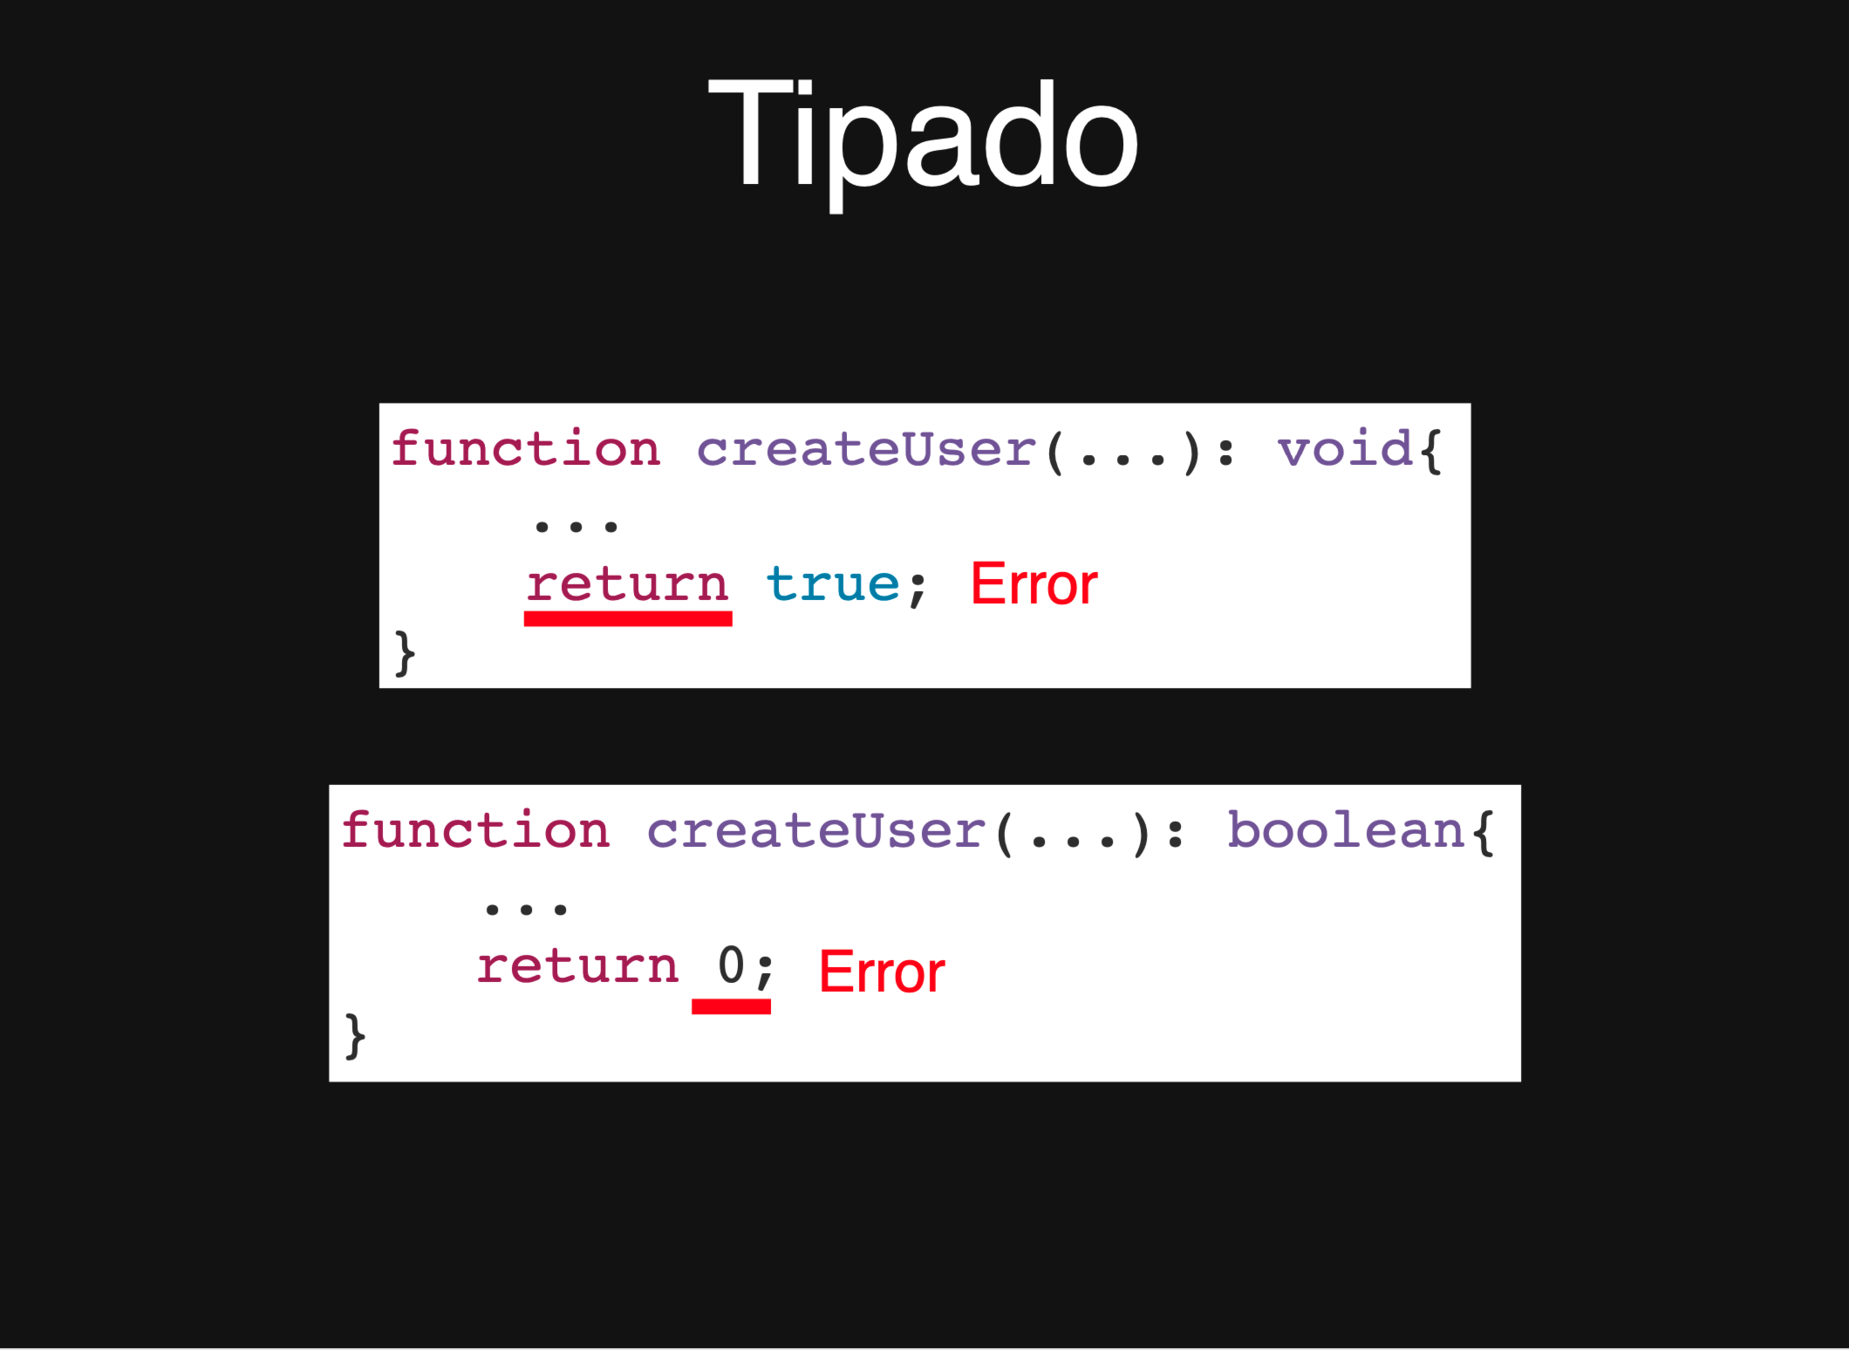
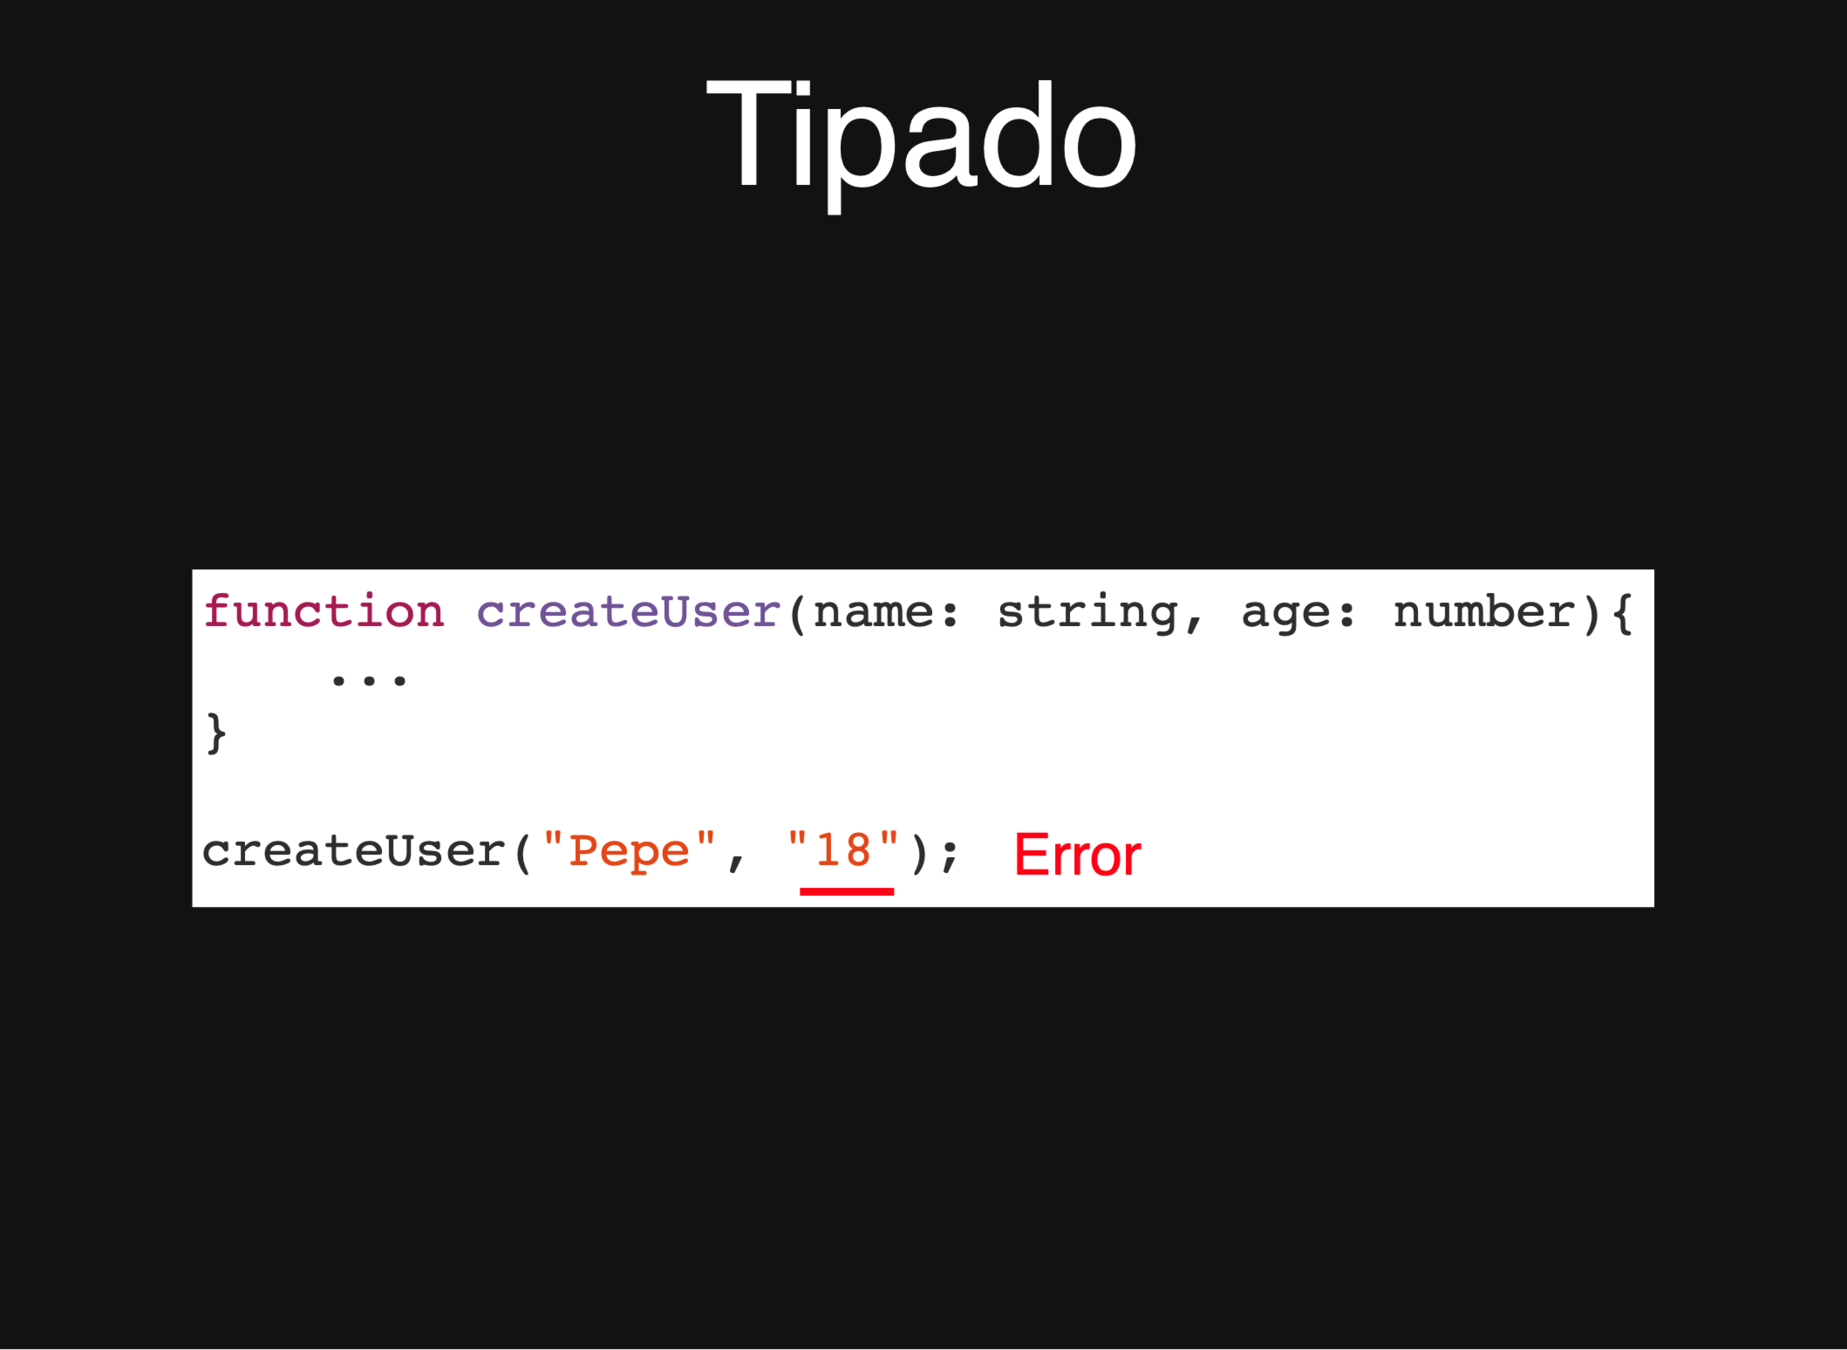
Tipado
function createUser(email, name, age){ ...}Javascript
function createUser(email: string, name: string, age: number){ ...
}
Typescript
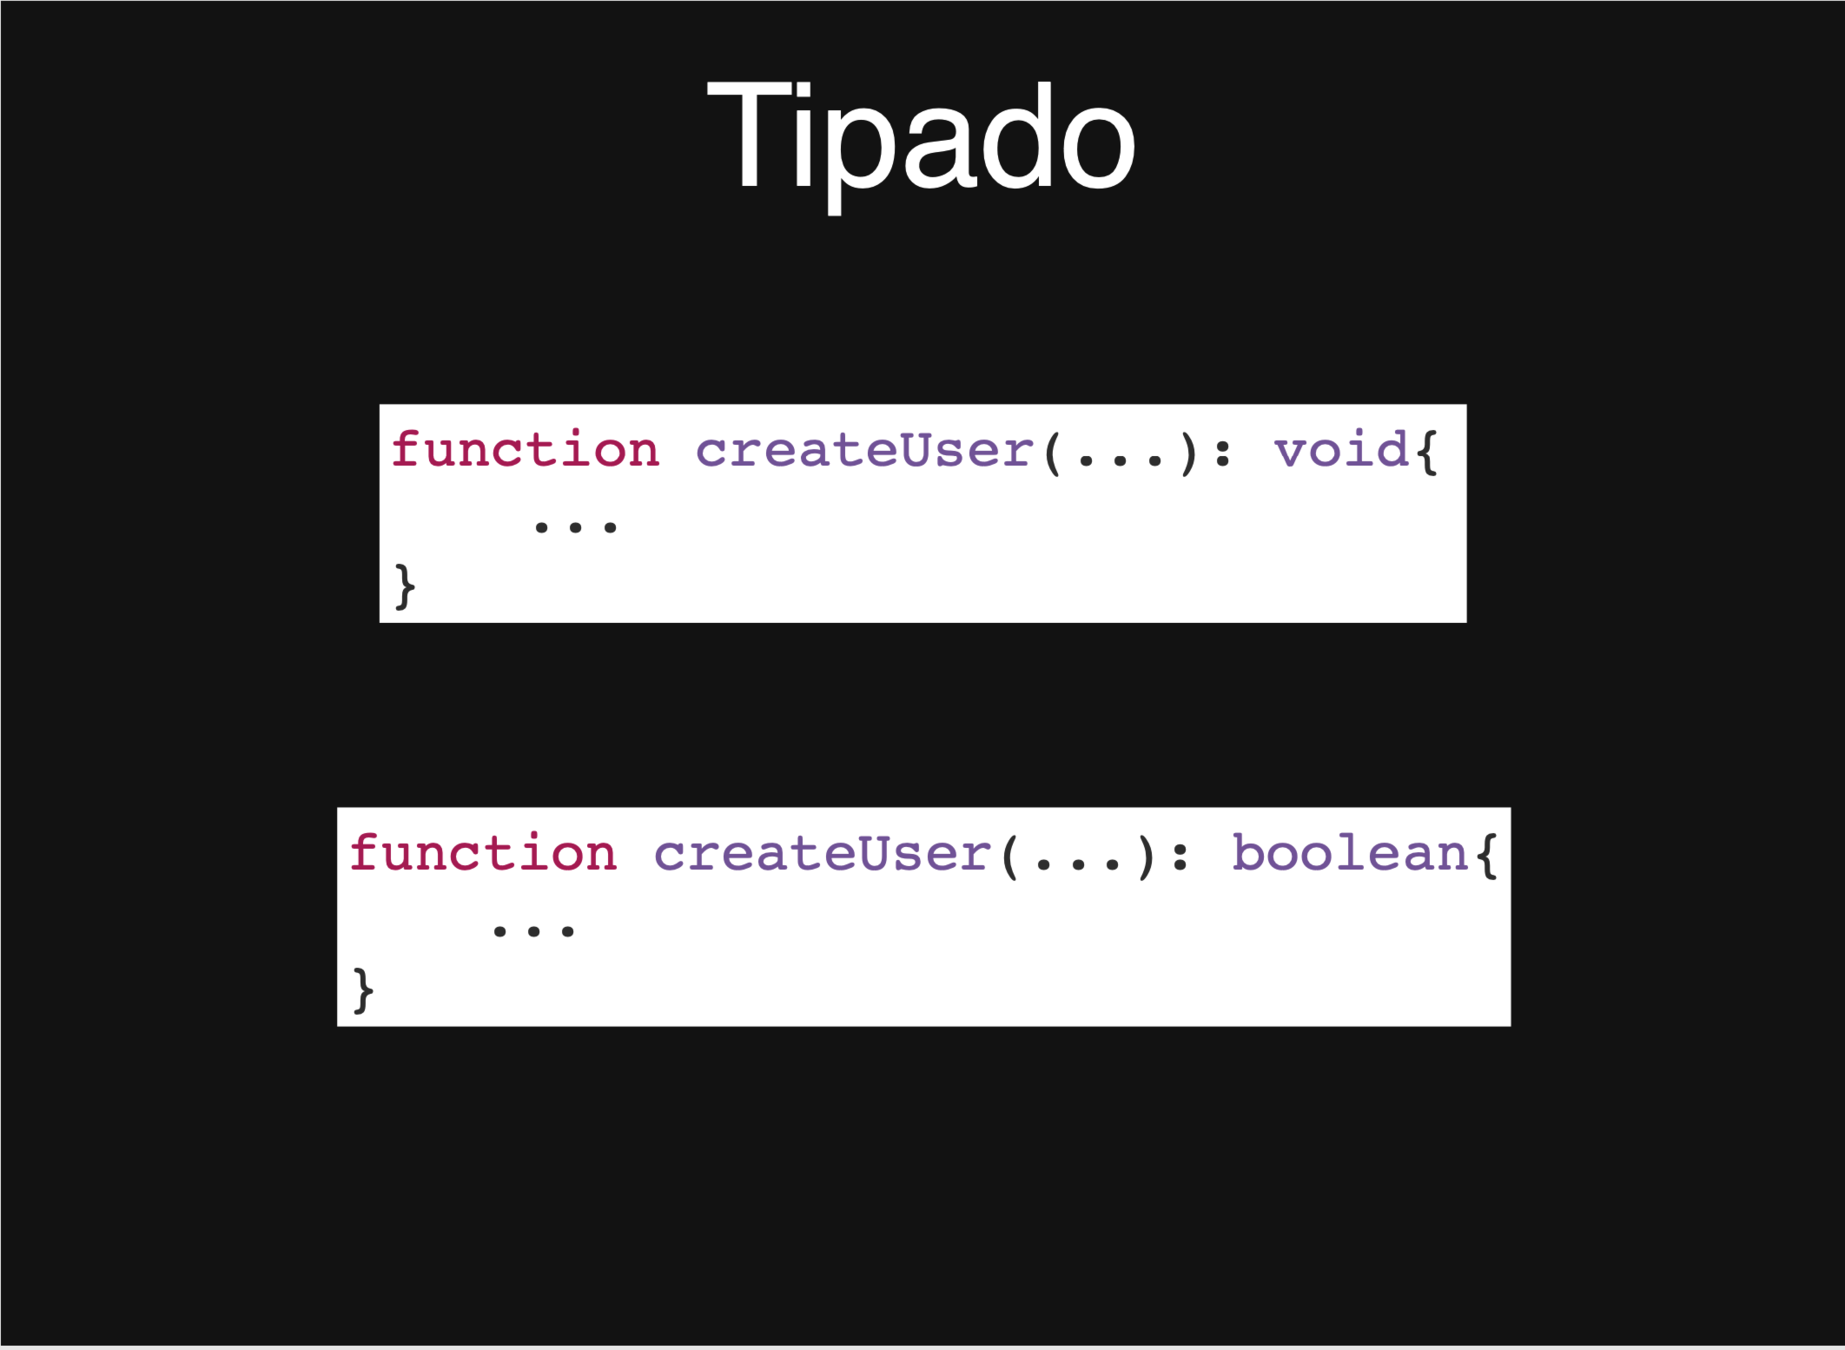

Typescript en Angular
//Se declara de la siguiente forma.

export class AppComponent {
  public name: string = 'Manolín';

  constructor () {
    //El constructor es el que primero se
    //inicializa al iniciar la clase.
    alert(`${this.getHello()} ${this.name}`)
  }

// Para declarar una función
  public getHello() : string {
    return 'Hello';
  }
}
this this this
this this this
this this this
this this this
this this this
TWO WAYS DATA BINDING
EN ANGULAR2+
Nos encontraremos que cada página o componente se compone de :
un fichero .html
un fichero .css
un fichero .ts
EN ANGULAR2+
Nos encontraremos que cada página o componente se compone de :
un fichero .html
un fichero .css
un fichero .ts
LA VISTA
EL MAQUILLAJE
LA LOGICA
¡¡ {{ magic }} !!
{{ entre llave y llave }}
puedo ejecutar funciones
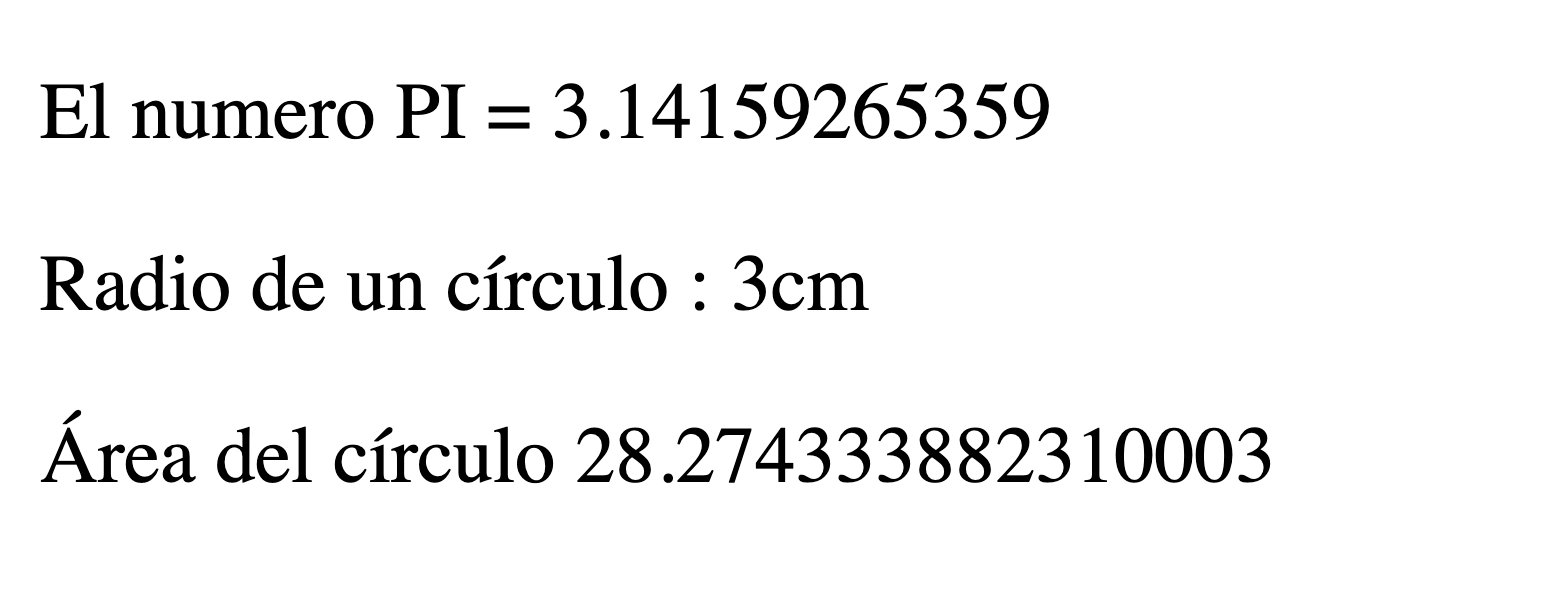
<p> El numero PI = {{ getPi() }}</p>

<p>Radio de un círculo : 3cm </p>

<p>Área del círculo {{ (getPi() * radio*radio) }}</p>
export class AppComponent {
radio : number = 3;
getPi(): number {
return 3.14159265359;
}
}{{ entre llave y llave }}
puedo ejecutar funciones
<p> El numero PI = {{ getPi() }}</p>
<p>Radio de un círculo : 3cm </p>
<p>Área del círculo {{ (getPi() * radio*radio) }}</p>
export class AppComponent {
radio : number = 3;
getPi(): number {
return 3.14159265359;
}
}[ ]
Realmente cuando usamos unos corchetes, le estamos indicando a angular que ese atributo tiene a la derecha del igual una expression a evaluar
salvo en ngmodel
[binding]
[ ]
Cuando usamos unos corchetes, le estamos indicando a angular que vamos a usar variable declarada en el fichero.ts o que es una expresión
<img [src]="url" alt="foto">

[ ]
Para este ejemplo, la diferencia entre src y alt
-
[src]: espera una variable
-
alt: espera un string
<img [src]="url" alt="foto">
[bindear]
<img
    [src]="imagen.fuente"

    [alt]="imagen.alt"

    [title]="imagen.title"
/>

<a [href]="nuevaRuta"> pincha aquí </a>
//ts
imagen = {
fuente : "https://via.placeholder.com/600/771796",
alt : 'imagen',
title : 'cuadrado random'
}[cualquierAttr]
<img
    [src]="image.link"

    [alt]="image.alt"

    [title]="image.title"
/>

<a [href]="nuevaRuta"> pincha aquí </a>

<div [class]="clases" [id]="id"> Divs</div>
[ngStyle]
[ngStyle]="{ 'color' : color}"
[ngClass]="{ 'pintame' : condicion}"
//css
.pintame {
  color: red;
}
[ ]
La diferencia entre src y alt
-
[src]: espera una variable
-
alt: espera un string
<img [src]="url" alt="foto">

No te ha quedado cloro?
probemos el código ⬇️
( )
Los paréntesis nos sirven para asociarnos a un evento y asignarle una función declarada en el fichero.ts
(click)="increment(2)"
<p>Num : {{num}}</p>
<button (click)="increment(1)">Sumar 1</button>
<button (click)="increment(2)">Sumar 2</button>
(click)="increment(2)"
(click)="increment(2)"
(eventos)
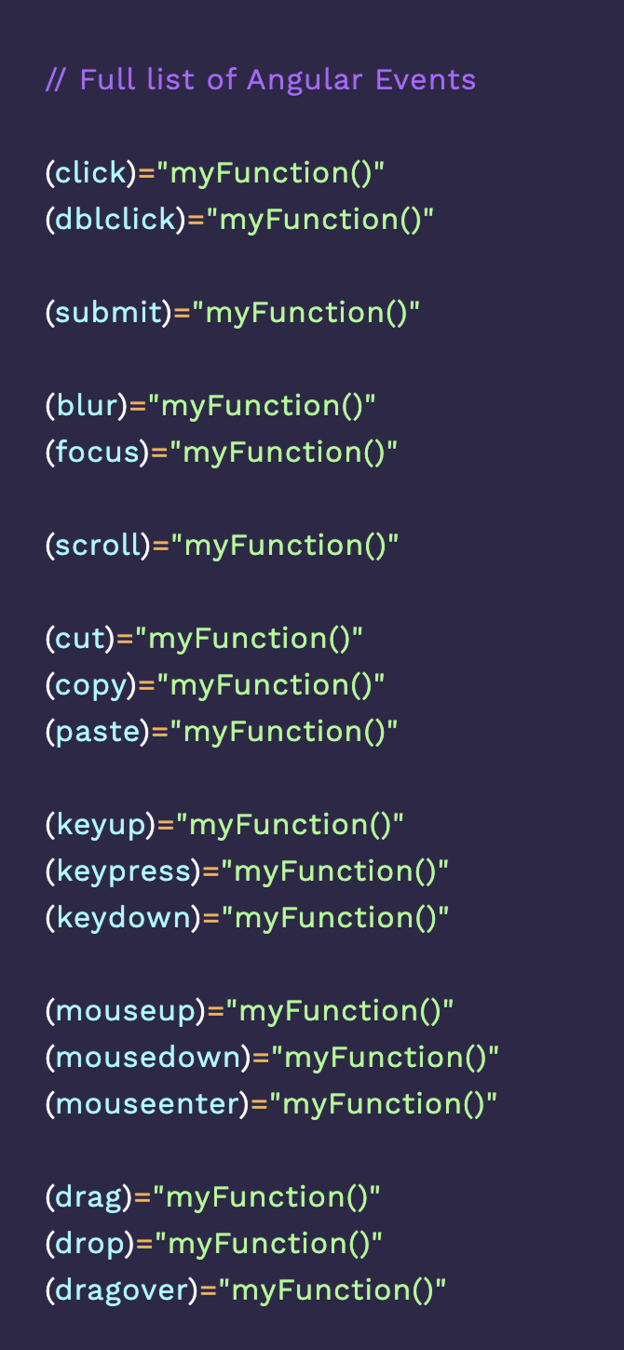
( )
¡¡¡Resumen!!!
[ ]
Fichero.html
Fichero.ts
Fichero.html
Fichero.ts
[( NGMODEL )]
Recoger valores de un input
<p> El numero PI = {{ getPi() }}</p>
<input type="number" placeholder="Radio" [(ngModel)]="radio" />
<p>Área del círculo {{ (getPi() * radio*radio) }}</p>
export class AppComponent {
radio : number = 3;
getPi(): number {
return 3.14159265359;
}
}Vamos a la práctica

¿En qué podemos utilizar esto?
Todo mezclado
export class AppComponent {
  items: string[] = [];
  newTask: string;

  add(): void {
    this.items.push(this.newTask);
    this.newTask = "";
  }

  deleteMe(task: string): void {
    this.items = this.items.filter(i => i != task);
  }

}
<ul>
Lista
<li *ngFor="let item of items">
<span>{{item}}</span>
<button (click)="deleteMe(item)"> Borrar</button>
</li>
</ul>
<input placeholder="Nuevo" [(ngModel)]="newTask">
<button (click)="add()">Añadir</button>Todo mezclado
export class AppComponent {
  items: string[] = [];
  newTask: string;

  add(): void {
    this.items.push(this.newTask);
    this.newTask = "";
  }

  deleteMe(task: string): void {
    this.items = this.items.filter(i => i != task);
  }

}
<ul>
Lista
<li *ngFor="let item of items">
<span>{{item}}</span>
<button (click)="deleteMe(item)"> Borrar</button>
</li>
</ul>
<input placeholder="Nuevo" [(ngModel)]="newTask">
<button (click)="add()">Añadir</button>
Todo mezclado
export class AppComponent {
  items: string[] = [];
  newTask: string;

  add(): void {
    this.items.push(this.newTask);
    this.newTask = "";
  }

  deleteMe(task: string): void {
    this.items = this.items.filter(i => i != task);
  }

}
<ul>
Lista
<li *ngFor="let item of items">
<span>{{item}}</span>
<button (click)="deleteMe(item)"> Borrar</button>
</li>
</ul>
<input placeholder="Nuevo" [(ngModel)]="newTask">
<button (click)="add()">Añadir</button>
Empezemos
- *ngFor
- [hidden]
- *ngIf
*ngFor
Bucles con Angular (*ngFor)
 <ul>
    <li *ngFor="let word of stack">{{word}}</li>
 </ul>
export class AppComponent {
public word : string = '';
public stack : string[] = ['Esto', 'es', 'un', 'array'];
public addTask (task: string) {
this.stack.push(task);
}
}OJO!!! Se pone el for en el elemento que queremos que se repita!!
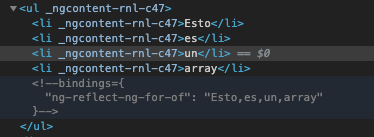
 <ul>
    <li *ngFor="let word of stack">{{word}}</li>
 </ul>
export class AppComponent {
public word : string = '';
public stack : string[] = ['Esto', 'es', 'un', 'array'];
public addTask (task: string) {
this.stack.push(task);
}
}*ngFor="let palabra of diccionario"
Primera iteración: value = array[0]
Segunda iteración: value = array[1]
Bucles con Angular (*ngFor)
 <ul>
    <li *ngFor="let word of stack">{{word}}</li>
 </ul>
export class AppComponent {
public word : string = '';
public stack : string[] = ['Esto', 'es', 'un', 'array'];
public addTask (task: string) {
this.stack.push(task);
}
}*ngFor="let palabra of diccionario"
Probemos lo aprendido!
https://stackblitz.com/
Bucles con Angular (*ngFor)
Ahora te toca a tí
Haz una aplicación de gestión de tareas similar a la del gif anterior que cumpla con:
- El usuario podrá rellenar un input y darle a guardar
- El usuario debería de poder borrar una tarea.
Estamos con esto 1h
[hidden]="condicion"
Si la condición da true se ocultará el elemento, si no se mostrará en la pantalla
<div *ngFor="let person of people" class="card"
	[ngClass]="{'underage': person.age < 18}"
	[hidden]="person.age > 49">

</div>
se muestran todos, menos......? (Pregunta)
Condiciones con Angular (*ngIf)
<div *ngIf="stack.length > 0">
  <ul>
    <li *ngFor="let word of stack">{{word}}</li>
  </ul>
</div>

<div *ngIf="stack.length == 0">
  <h2>No hay ningúna entrada!</h2>
</div>
export class AppComponent {
public word : string = '';
public stack : string[] = [];
public addTask (task: string) {
this.stack.push(task);
this.word = '';
}
}*ngIf = "condición"
Aunque no tenga los [], el ngIf espera una condición booleana.
Que le diga si se muestra o no se muestra
Condiciones con Angular (*ngIf)
<div *ngIf="stack.length > 0">
  <ul>
    <li *ngFor="let word of stack">{{word}}</li>
  </ul>
</div>

<div *ngIf="stack.length == 0">
  <h2>No hay ningúna entrada!</h2>
</div>
*ngIf = "condición"
Se muestra solo si stack tiene algo.
Sino, sale el div de debajo.
*ngIf="condicion"
Si la condición da true se mostrará en el DOM, si no...,
SE BORRARÁ DEL DOM
*ngIf vs [hidden]
*ngIf vs [hidden]
*ngIf vs [hidden]
<button
      *ngIf="hideCompleted"
      (click)="hideCompleted = !hideCompleted"
      >Mostrar completados
</button>
<button
      *ngIf="!hideCompleted"
      (click)="hideCompleted = !hideCompleted"
      >Ocultar completados
</button>
<li
[hidden]="hideCompleted && item.completed"
*ngFor="let item of items"
[ngClass]="{'completed' : item.completed}">
<span (click)="completeMe(item.title)">{{item.title}}</span>
<button (click)="deleteMe(item.title)"> Borrar</button>
</li>desaparecerá
se hace invisible
Bucles con angular (*ngFor)
Ahora más difícil

¿y si tenemos un array de objetos?
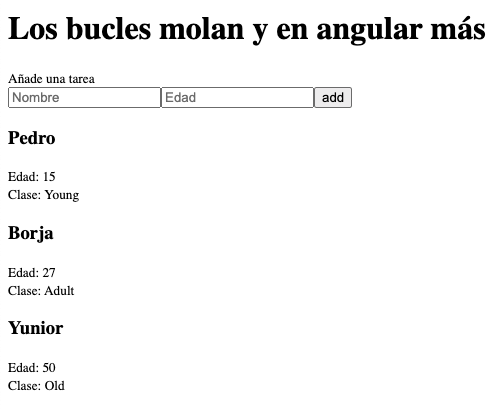
export class AppComponent {
public people: any[] = [];
public person: any = {
name: '',
age: null,
type: ''
};
constructor() {
this.people = [
{
name: 'Pedro',
age: 15,
type: 'Young'
}, {
name: 'Borja',
age: 27,
type: 'Adult'
}, {
name: 'Yunior',
age: 50,
type: 'Old'
}
]
}
}<div *ngIf="people.length > 0">
<div *ngFor="let person of people">
<h3>{{person.name}}</h3>
<small>Edad: {{person.age}}</small>
<br>
<small>Clase: {{person.type}}</small>
</div>
</div>
<div *ngIf="people.length == 0">
<h2>No hay ningúna entrada!</h2>
</div>¿y si tenemos un array de objetos?
export class AppComponent {
public people: any[] = [];
public person: any = {
name: '',
age: null,
type: ''
};
constructor() {
this.people = [
{
name: 'Pedro',
age: 15,
type: 'Young'
}, {
name: 'Borja',
age: 27,
type: 'Adult'
}, {
name: 'Yunior',
age: 50,
type: 'Old'
}
]
}
}Fácil y rápido!!!
Pruébalo sin miedo y juega con él!
Ahora te toca a tí. En grupos
Haz una aplicación de gestión de tareas que cumpla con:
- El usuario podrá rellenar un input y darle a guardar para crear una nueva tarea
- El usuario debería de poder borrar una tarea.
- El usuario puede marcar como completada una tarea.
-
Si completa todas las tareas, habrá un mensaje que te felicitará por terminar tus tareas! Se deberá ir a los 5 segundos. (investiga setTimeout)
- Ordenar la lista de más antiguo a más nuevo. (Opcional).
- Usa bootstrap para que te quede todo bien bonito. Puedes poner el enlace cdn en el index.html. (Opcional)
- Ponerle prioridad a las tareas, poder ordenarlas por prioridad, poder ver solo las más prioritarias, etc. (Opcional).
[ngClass]="{ 'nombre-clase' : condicion }"
[ngClass]="{ } "
[ngClass]="{ nombreClase : condicion }"
export class AppComponent {
users = [
{name : "Yunior" , role : 'teacher'},
{name : "María" , role : 'student'}
]
}
<div *ngFor="let user of users"
[ngClass]="{ 'teacher' : user.role === 'teacher' }"
class="user">
<h2>{{user.name}}</h2>
</div>[ngClass]="{ } "
[ngClass]="{ 'completed' : task.completed }"

[ngClass]="{ } "
[ngClass]="{ 'completed' : task.completed }"
Apliquemos esto a nuestro ejemplo anterior
Probamos reutilizando el código de antes
<!-- HTML -->
<div *ngIf="people.length > 0">
<div *ngFor="let person of people" class="card" [ngClass]="{'underage': person.age < 18}">
<h3>{{person.name}}</h3>
<small>Edad: {{person.age}}</small>
<br>
<small>Clase: {{person.type}}</small>
</div>
</div>//CSS
.card {
border: 1px solid black;
border-radius: 10px;
width: 25%;
margin-top: 10px;
padding: 10px 20px;
}
.underage {
border: 2px solid red;
}

Tener en cuenta
⬇️
*ngfor no puede estar junto a un *ngIf
*ngfor no puede estar junto a un *ngIf
<li
*ngIf="!hideCompleted || !item.completed"
*ngFor="let item of items"
[ngClass]="{'completed' : item.completed}">
<span (click)="completeMe(item.title)">{{item.title}}</span>
<button (click)="deleteMe(item.title)"> Borrar</button>
</li>
*ngfor no puede estar junto a un *ngIf
<li
  [hidden]="hideCompleted && item.completed"
  *ngFor="let item of items"
  [ngClass]="{'completed' : item.completed}">
    <span (click)="completeMe(item.title)">{{item.title}}</span>
    <button (click)="deleteMe(item.title)"> Borrar</button>
</li>TU turno. Mejora la lista de tareas
- Ahora el usuario podrá completar una tarea.
-
Marcar en rojo las tareas que sean anteriores al día de hoy.
- Tendrá que poder eliminarla también como antes.
- Además, harás un botón adicional que borrará todas las tareas.
- Poder pulsar un botón (TODAY) que filtre y muestre las tareas de hoy (Opcional).
- Y otro botón adicional que completará todas las tareas
Para casa !
Practicamos todo lo aprendido hoy. Mejoramos nuestra app de lista de tareas haciendo uso de los *ngIf *ngFor [ngClass] [hidden] (click) (mouseover) (keyup.enter), etc etc
- Fíjate en herramientas de todo list que hayan por internet e intenta crear una buena y potente que te sirva de portfolio como primer pet-project con angular ;)
-
Usa bootstrap o la librería de css que prefieras (materialize.css)
- Prueba y juega con una librería que se llama animatecss ;) ponle .animated a las cositas